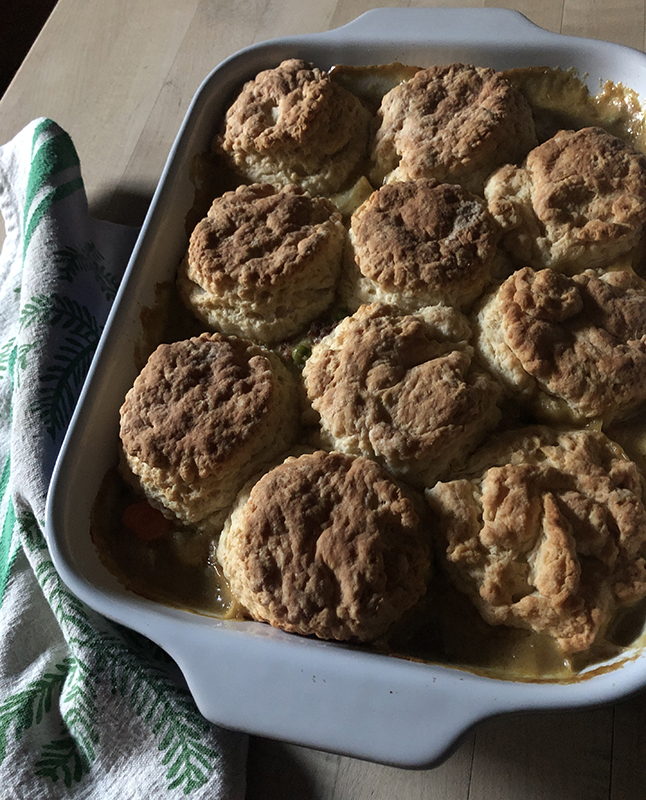
Rhubarb scones

This one is taking a lot of tries to get right! I began by trying this Food52 recipe, Naughty Rhubarb Scones. Lots of butter and cream, and they tasted good, but a little too flat.

Next I tried reducing the butter, adding an egg, and using buttermilk instead of heavy cream. That resulted in rhubarb muffin tops, OK but a bit bland.

Next, I tried even less butter, not tossing the rhubarb with sugar before adding it to the scones – on the theory that drew out too much moisture from the rhubarb – and using an egg, plain whole milk yogurt, and a little bit of milk for the liquid. Best of the three, but could maybe still have a little more butter. Or whatever it takes to get a slightly better texture. Maybe more butter and no egg.

So, we’re going with take 3; take 4 updates added. They’re still a bit too cake-y, but taste pretty good! Pic of take 4 below.

1 3/4 cups rhubarb, rinsed, trimmed and cut into 1-inch slices, about 3 stalks
2 1/2 cups unbleached white flour
5 tablespoons sugar
2 teaspoons baking powder
1 teaspoon baking soda
2 good pinches kosher salt
4 6 tablespoons butter
1 large egg 2 egg yolks
2 tablespoons plain whole milk yogurt
1 teaspoon vanilla
3-4 tablespoons whole milk
1 additional tablespoon of sugar for sprinkling, or use coarse sugar

First prep the rhubarb, and set aside.

Combine the flour, 5 tablespoons sugar, baking powder, baking soda, and salt in the bowl of a food processor. Slice in the butter and pulse to combine. Add the rhubarb and pulse 9 times. Transfer the mixture to a bowl. If you don’t have a food processor, combine the dry ingredients in a bowl, and then either cut in or grate the butter. Give the rhubarb and extra chop to get the pieces slightly smaller, then proceed as below.

Place the egg yolks in a spouted measuring cup and add the yogurt and vanilla. Add 3 tablespoons of the milk to get the liquid up to 2/3 1/2 cup. Make a well in the center of the dry ingredients and pour in the liquid. Mix with a fork until the dough starts to come together, then use your hands to combine into a dough, adding the additional tablespoon of milk if there continues to be lots of dry flour around the edges. Turn out on to a lightly floured surface and knead a few times until fairly smooth. Divide the dough in half, and cut each half into 6 wedges. Arrange the wedges on a parchment lined baking sheet and place in the freezer for at least 15 minutes while you heat the oven to 425°. You can also cover the pan and refrigerate the scones overnight.

Sprinkle the chilled scones with sugar and place in the oven. Reduce the heat to 400° and bake for 18-20 minutes until firm and golden brown.

Ranchero Sauce

I love to make this sauce in late summer when tomatoes and peppers are in abundance at local farmers markets. You can freeze it for a taste of summer in winter. Or make it with canned tomatoes in winter! It’s the sauce for chilaquiles and huevos rancheros, but also good on enchiladas, as shown. The sauce can also easily be doubled, just use a bigger pot. I like to make this sauce with veggie broth so that it’s all purpose – but feel free to sub chicken broth if there are no vegetarians to be fed at your table.

With a hat tip to Chile Pepper Madness for the inspiration!

1-2 tablespoons vegetable oil
1 1/2 cups chopped onion
1 bell pepper or 1-2 poblano peppers, chopped (about 1 cup)
3-4 cloves garlic, minced or put through a press
2 tablespoons ground ancho chile powder
1 tablespoon hot or mild chile powder (I like Penzey’s)
1 teaspoon dried oregano, preferably Mexican
1 teaspoon ground cumin
2 cups plum tomatoes, peeled and diced OR one 14-oz. can of diced tomatoes OR whole tomatoes
1 cup vegetable broth
(optional) 2 teaspoons to 1 tablespoon brown sugar (good with canned tomatoes)
¼ cup chopped cilantro
Salt and freshly ground pepper to taste
(optional) juice of 1 lime (2-3 tablespoons)

  1. Pour the vegetable oil into a deep pot that’s at least 2 quarts, and heat over medium-high. Add the onion and chopped peppers and cook for about 5 minutes until starting to soften. Add the garlic, and cook a few more minutes until fragrant. Add the ground spices and oregano, and if the pan seems dry, add the last tablespoon of oil.
  2. Add the tomatoes and vegetable broth, and brown sugar if using. Bring to a boil, then turn the heat down and let the sauce simmer gently for about 20 minutes. It should thicken nicely. Puree the sauce with an immersion blender or in the food processor. When it’s smooth add the cilantro and lime juice if using.
  3. Use right away or cool and store in a container (preferably glass) in the fridge for up to week. Freeze for longer storage.

[Extra] recipe-a-month for May 2024

Pumpkin Cinnamon Buns with Date Filling

In one of her recipe posts Deb Perelman of Smitten Kitchen muses that cinnamon buns are perfect so we hardly need a new recipe. But of course we always want more, so the possibilities for more cinnamon bun recipes are endless. This one is based on a sweet potato cinnamon bun recipe by Carla Hall, that’s very good. But I made these in April, when I didn’t have a lot of sweet potatoes on hand, but I did have two cartons of “pumpkin” puree, actually winter squash, still in the freezer. So pumpkin replaced the potatoes, and date filling replaced the sweet potato filling.

Dough
4 to 4 1/2 cups unbleached all-purpose flour
⅓ cup sugar
2¼ teaspoons (1 packet) instant yeast
1½ teaspoons table salt
1¼ cups whole milk
6 tablespoons room temperature unsalted butter
1/2 cup pumpkin puree, room temperature
1 large egg, room temperature

Filling
1 packed cup of pitted and chopped dates, preferably Medjool
2 tablespoons butter, softened
1/4 cup dark brown sugar
1 teaspoon cinnamon
1 teaspoon pumpkin pie spice
pinch of kosher salt

Frosting
4 oz cream cheese, room temperature
½ cup unsalted butter, room temperature
3 cups powdered sugar
2 tablespoons milk
1 tablespoon maple syrup
1 teaspoon vanilla extract
Pinch salt

Make the dough: Combine 2 cups of the flour, sugar, yeast, and salt in the bowl of a stand mixer.

Combine the milk and butter in a spouted glass measuring cup that’s at least two cups (or a small microwave safe bowl), and microwave until warm and the butter is starting to melt. In my microwave this took 45 seconds, but yours may vary. Stir until butter is melted.

If you have an instant read thermometer check the temperature of the milk/butter mixture – it shouldn’t be hotter than 90° to 100°. Once it’s cool enough, pour the mixture into the flour mixture. Add the pumpkin and egg. Attach bowl to the mixer fitted with the paddle attachment. Mix on low speed, and add two cups of the the flour a cup at a time. When the flour has been incorporated the dough shouldn’t have any really gooey spots and should be starting to clear the sides of the bowl.  Add up to half cup flour to get to the right consistency, then knead on low speed for 9-10 minutes or until the dough is smooth and elastic. I do this with the paddle, but you can switch to the dough hooks if you like.

Transfer the dough to a plastic container with a lid, and let rise about an hour until doubed. Preferably your container has volume markings so you can tell when the dough has doubled, but if not, put a rubber band around the outside of the container at the level of the top of the dough, so you can tell when it’s doubled.

While the dough rises, make the filling: Place the dates in a heat proof bowl and pour in 1 to 1 1/2 cups boiling water. Let stand to soften, 10 minutes or more. Drain the dates, and puree in a food processor with the butter, sugar, and salt. Add the cinnamon and pumpkin pie spice. You can refrigerate the filling while the dough rises in the fridge. Let it come to room temperature before assembling the buns or it will be difficult to spread.

Assemble the buns: Butter or grease a 13 x 9 x 2 baking dish. Turn the dough out onto a lightly floured surface and roll into an approximately 12 x 18 inch rectangle, getting the sides as straight as you can.  Spread an even layer of the filling over the dough, leaving more margin at the top long side.

Starting with the long side closest to you roll the dough tightly. Use the margin to pinch and seal. Place the seam side down and even up the roll. Cut into 12 as-equal-as-you-can-get-them slices, and arrange in the greased baking dish. Some people like to use unflavored dental floss for this; I usually just use a knife. Cover the pan with a damp dishtowel or a lid and let rise another hour until doubled.

Bake the buns: while the dough is rising heat the oven to 350°.  Bake the buns for 25-35 minutes until they’re firm and risen. Cover the pan with foil if the buns brown too quickly. Remove the buns from the oven and let cool 20-30 minutes. before frosting.

Make the frosting: Place the cream cheese and butter in the bowl of a stand mixer. Using either the paddle or the whisk, beat the cream cheese and butter briefly until combined. Add the powdered sugar, maple syrup, milk, vanilla, and salt. Mix on low until the sugar’s incorporated and then beat for 2-3 minutes until smooth and fluffy. Spread the frosting over the tops of the buns and serve warm from the pan. You’ll probably have leftover frosting – I like to sandwich cinnamon grahams or Biscoff cookies with the  leftover frosting and let them harden in the fridge to eat later as a snack.

The buns will keep at room temperature for about 3 days, covered. Refrigerate for longer storage. You can also freeze unfrosted buns.

Recipe a month for May 2024

[Relatively] Quick Crescent Rolls

These rolls are of course inspired by poppin’ dough crescent rolls. They’re not as quick as smashing open a tube of purchase dough, but they’re easy and can be made when you have a couple of hours and can be refrigerated and baked later, or baked, cooled, and frozen to be reheated. You do need softened butter which can take planning ahead – but the butter that goes into the dough (the 4 tablespoons) is cut into pieces so will soften pretty quickly and the butter that you spread on the dough will soften during the dough’s first rise. You can also start it in the microwave. To get your egg up to room temperature quickly, place it in a small bowl or custard cup and run warm water on it. Let stand while you gather the ingredients for the crescents.

1 packet, 2 1/4 teaspoons, active dry yeast
6 tablespoons warm water
2 tablespoons granulated sugar (I think honey would also be good, but have not tested)
1 egg, room temperature
1/2 teaspoon salt
2 cups unbleached all-purpose flour, divided
4 tablespoons unsalted butter, cut into small pieces and allowed to come to room temperature
2 tablespoons butter, softened
1 egg beaten with a splash of water for egg wash

Pour the warm water into a mixing bowl or the bowl of a stand mixer. Sprinkle the yeast on top and let stand about 5 minutes until dissolved.

Add the sugar, egg, salt, and one cup of the flour to the mixing bowl, Begin mixing with a spatula or the flat beater. When it looks like a dough, add the butter pieces and continue to mix to incorporate. Add enough of the remaining cup of flour to make a soft dough that’s not too sticky. If your mixing by hand, turn the dough out onto a floured surface and knead for 5-10 minutes until smooth. If you’re using a stand mixer, beat with the padel for about 3 minutes.

Place the dough in a container with a lid and let rise for an hour to 90 minutes, until doubled.

Line a baking sheet with parchment paper. Scrape the dough out of the container onto a floured surface and roll out into a 12-inch circle. Gently spread the 2 tablespoons of butter onto the dough. Cut the circle into quarters and then cut each quarter into 3-4 wedges. Roll the wedges towards the point to form crescents and place on the parchment lined tray. Cover loosely and let rise another hour, or place in the fridge for up to overnight and bake later. Towards the end of the rising time heat the oven to 400°.  Brush the rolls with the egg wash and place in the oven.  Immediately reduce the heat to 375°. Bake for about 12-15 minutes until golden brown. Eat right away or cool completely and freeze for later.

Recipe a month for April 2024

Cream scones

Americans like our scones with all kinds of flavors, like blueberry, pumpkin, chocolate chips, apricot & white chocolate …  but traditional British scones are plainer, and are a vehicle for jam and cream. This cream scone recipe is plainer, and is perfect for conveying large amounts of jam and cream to the eater’s mouth. The picture shows scones made with some whole wheat flour. Since real British clotted cream is hard to get in the US, I recommend spreading plain scones with ricotta (homemade or purchased) or strained or Greek yogurt, or crème fraîche (homemade or purchased) and of course your favorite jam. The British method of eating scones is to break off parts of scone, and cream and jam the pieces individually rather than spreading the entire surface of a halved scone, as an American might.

For more tea party recipes see this document.

3 cups flour, all unbleached white or up to 1 cup whole wheat
1 tablespoon baking powder
1 teaspoon table salt
1/4 cup granulated sugar
1 teaspoon vanilla
1 1/3 to 1 1/2 cups heavy cream, plus a little extra for brushing

Combine the flour(s), baking powder, salt, and sugar in a large mixing bowl. Make a well in the center and pour in the smaller amount of cream and the vanilla. Stir with a fork until you have a cohesive dough, adding more cream if necessary.

Libe a baking sheet with parchment. Turn the dough out onto a floured surface and divide it in half, and shape each half into a disk. Cut each disk into 6 wedges. Place the baking sheet in the freezer while you heat the oven to 425°.

Remove the scones from the freezer and brush the tops with some cream, if desired. Bake the scones for about 15 minutes until browned and there’s no wet dough in the center. Serve warm with butter and jam and any other creamy toppings you like.

To keep the scones for longer, when frozen remove them from the baking sheet to a bag or container. Bake from frozen for 20-25 minutes. Baked and cooled scone can also be frozen for longer storage.

Kale Almond Shallot Salad with Miso-Lemon Dressing

This recipe is based on one of the little cooking vids that appear on my Instagram, with the recipe in fine print in the comments. The original is half shaved Brussels sprouts and half kale, but about the only way I could buy Brussels sprouts this time of year is pre-shaved in a little bag from Whole Foods for like $3.50. Whereas whole bunches of kale cost less. So I used all kale. I like a sweeter dressing, too, so added the maple syrup in the dressing.

Salad ingredients:
1 large bunch kale
3.5 oz., generous 1/2 cup almonds
3-6 shallots, about 3/4 cup, peeled and thinly sliced
kosher salt & freshly ground pepper
2 tablespoons olive oil

Dressing:
1/4 cup olive oil
1/4 cup fresh lemon juice (about 1 large lemon)
2 tablespoons miso
2 tablespoons maple syrup
kosher salt & freshly ground pepper

  1. Stem the kale and toss it into a sink or bowl of cool water, and let it soak while you prepare the almonds and shallots.
  2. Place the almonds into a skillet big enough to hold them in one layer, 10- to 12-inches. Toast over medium high heat, stirring and shaking the pan.  Transfer to a bowl and wipe out the pan.
  3. Pour the olive oil into the wiped out skillet and cook the shallots over medium high heat until they are starting to brown, about 8-10 minutes. Season with salt and pepper.
  4. Lift the kale out of the water and drain well in a colander. Take handfuls of the leaves and place them on a cutting board and slice thinly. Place in a large mixing bowl.
  5. For the dressing, whisk all the ingredients together in a spouted measuring cup or shake in a small jar with a tight-fitting lid.
  6. Add most of the almonds and shallots to the kale in the mixing bowl, pour about 2/3 of the dressing over, and toss well. Taste and add as much more dressing as you like (I used all of it), and season with salt and pepper. Top the salad with the remaining almonds and shallots and serve. The dressed salad also keeps well in the fridge for a few days and makes a tasty lunch.

Whole Wheat Blueberry Muffins

I had some whey from making ricotta, and made these muffins trying to use it up. The muffins can also be made with buttermilk or sour milk. This recipe is based on King Arthur Baking 100% Whole Wheat Blueberry Muffins. I used less sugar and an egg, and part unbleached white flour. See also my streusel-topped blueberry muffins for another variation.

3/4 cup light or dark brown sugar
1 1/2 cups whey or buttermilk or sour milk*
1 egg
1/3 cup vegetable oil
1 teaspoon vanilla Extract
2 cups unbleached white flour
1/2 cup whole wheat flour (feel free to adjust the flour proportion to your liking!)
3/4 teaspoon table salt
1 teaspoon baking powder
1/2 teaspoon baking soda
1 teaspoon cinnamon
1 cup blueberries, fresh or frozen
cinnamon sugar or coarse sugar (note that the coarse sugar usually melts after a couple of days!), for topping, optional

Heat the oven to 400°. Line a 12-well muffin pan with paper liners, or grease the wells.

Measure the sugar into a large mixing bowl, and add the whey or buttermilk, and egg. Mix with a whisk, and then pour in the oil in a steady stream, whisking until smooth and emulsified. Switch to a spatula and add the vanilla, making sure it’s evenly distributed. Measure in the flours, salt, baking powder and baking soda, and cinnamon. Mix with the spatula until there’s almost no dry flour left, then fold in the blueberries.

Scoop the batter into the muffin pan, and sprinkle with your desired topping – or not.

Bake for about 25 minutes until the tops are cracked and the muffins are firm.

*to make sour milk, pour a tablespoon plus a teaspoon of vinegar or lemon juice into the bottom of a spouted 2-cup measure. Pour in the milk of your choice – this does work with non-dairy milks, especially oat. Let stand for about 5 minutes to sour, then proceed with your recipe.

Grancakes

These are Grandma Linda, Emma’s mom’s, whole grain pancakes. They’re from a newsletter/website/cookbook called Forks Over Knives. This is sort of it. I also put the photos of the original recipe that Linda sent me at the bottom of this post.

I made them a little less healthy than the original. I didn’t have whole wheat pastry flour, so I used 1 cup of unbleached and 1/2 cup regular whole wheat. I used homemade applesauce that was lightly sweetened and I fry them in butter. Just a little.

1 1/2 cups whole wheat pastry flour
1/4 cup cornmeal
1/4 cup rolled oats
1 tablespoon baking powder
1/2 teaspoon fine salt
1/4 teaspoon ground cinnamon
1/8 teaspoon freshly grated nutmeg (I left this out and put in more cinnamon)
1 3/4 cups unsweetened plant-based milk (I used oat milk)
1/2 teaspoon vanilla
2 tablespoons maple syrup
1/2 cup unsweetened applesauce

1 cup berries for serving – optional
apple butter for serving – optional
more maple syrup for serving – not optional

    1. Combine the dry ingredients, the first seven, in a large bowl.
    2. Pour the milk into a spouted 2-cup measuring pitcher, and add the vanilla and maple syrup. Make a well in the center of the dry ingredients and pour in the milk mixture. Add the applesauce and mix well. A few lumps is OK.
    3. I think it works best if you let the batter sit for about 30 minutes before cooking to let the grains soak up the liquid. You can also refrigerate the batter overnight, or for a few days.
    4. Heat a large non-stick skillet or griddle over medium high heat until a drop of water sizzles. Optionally, melt a small pat of butter in the skillet. Ladle 1/4-1/3 cup dollops of batter and let cook until bubbling and the edges looks dry, before flipping to cook the other side.

Original recipe (PDF)

Butternut squash, sausage, and pasta bake

This pasta bake is like many others: homey and cheesy and comforting. What sets it apart is the butternut squash in the sauce, that makes the dish taste as rich as similar bakes with a lot more cheese. I’ve used ground or link pork sausage here, but try chicken or turkey sausage if you prefer, and you can make this vegetarian by subbing in some greens instead of the sausage.

Prep time: 30 mins.
Baking time: 30 mins.
Serves: 8

12 ounces pasta of your choice, I used penne
1 tablespoon olive oil
8 ounces ground Italian sausage or 3-4 links with casings removed or sliced, if it’s the type of sausage where you can’t remove the casing
1 large bell pepper, seeded and chopped

Sauce:
2 tablespoons butter
2-3 leeks, white and light green parts only, split longways and thinly sliced
2 pounds butternut squash, peeled and cut into cubes
2 to 2 1/2 cups chicken or vegetable broth, OR 2 cups reserved pasta cooking water and 1 bouillon cube
1/2 teaspoon ground or freshly grated nutmeg
1/2 cup grated Parmesan
1 1/2 cups grated cheese – sharp cheddar or a combination of cheddar and Swiss is good
kosher salt and freshly ground black pepper

Topping:
1 cup breadcrumbs (can be fresh or dried)
2 tablespoons olive oil
1 small garlic clove, minced or put through a press
1/4 cup grated Parmesan

  1. Cook the pasta in a large pot of well-salted boiling water until it’s a bit underdone, since it will be baked. Drain, reserving 2 cups of the cooking water if you are not using broth. Drop the bouillon cube into the reserved pasta water to melt while you prepare the other parts of the dish.
  2. Heat the olive oil in a large skillet, and brown the sausage. If using ground sausage, break it into smaller clumps with a wooden spoon as it browns. If you have any other type of link sausage, slice it and brown in the oil. Add the chopped bell pepper and continue to cook until the pepper is soft. Remove from the heat and set aside.
  3. Melt the butter in a large pot or Dutch oven with a lid. Add the leeks and a generous pinch of kosher salt, stir, and cover. Reduce the heat to low, and cook until the leeks are soft but not brown, about 10 minutes. Add the squash cubes and the broth (or pasta water/bouillon mixture), cover, and simmer until the squash is tender, about 10 minutes. The squash cubes should be submerged; add a little more water if necessary. Remove from the heat and puree until smooth using an immersion blender. You can also use a food processor or blender but cool the mixture for about 10 minutes before proceeding. Add the nutmeg and the Parmesan and grated cheese(s) and stir until the cheese melts. Taste and season with salt if needed and freshly ground pepper.
  4. Heat the oven to 400°. Stir the sausage mixture and the pasta into the sauce and spread into a 9 x 13 x 2 baking dish. Bake for 20 minutes until bubbly.
  5. For the topping, heat the olive oil in a pan and add the minced garlic. Add the bread crumbs, stir to coat with oil, and cook a few minutes until the crumbs are slightly toasted and the garlic is fragrant. Set aside to cool. After the pasta has baked for 20 minutes combine the 1/4 cup Parmesan and the crumbs, which should be cool by now, and top the pasta with this mixture. Bake for 10 more minutes and serve.

Braised red cabbage with apple and bacon

4 ounces of bacon, 5-6 slices, cut crosswise into 1-inch pieces
olive or vegetable oil, if needed
1 cup of chopped onion
2 pounds of red cabbage, shredded or thinly sliced
1 medium apple, cored, quartered, and sliced (about 1 cup of slices)
2 tablespoons brown sugar
1/4 cup water
1/4 cup cider vinegar
Salt and freshly ground pepper to taste
Note on shredding cabbage – you can use a box grater or food processor to shred the cabbage, or (my preferred method) cut it into quarters and thinly slice each quarter crosswise with a sharp knife.

  1. Place the bacon bits in a Dutch oven over medium heat and fry until crisp. Remove with a slotted spoon to paper towel to drain.
  2. Pour the bacon fat into a small bowl and wipe out the Dutch oven. Measure two tablespoons of bacon fat and add to the pan, adding olive oil if necessary. Add the chopped onions and cook over medium heat until translucent. Add the cabbage – you may have to do this in batches, covering the pan in between to wilt the cabbage down to make room. Season with salt and pepper, stir well, and cook covered for about 5 minutes.
  3. Add the apple, brown sugar, water, and cider vinegar, and stir to combine. Bring to a boil, then cover and reduce the heat and braise the cabbage for about 20 minutes, until very soft. Check at about 10 minutes to make sure it’s not getting too dry. Add a little water of necessary.
  4. When the cabbage is as tender as you like it, taste and check for salt. Sprinkle the bacon bits over and serve.