Sauce Ingredients:
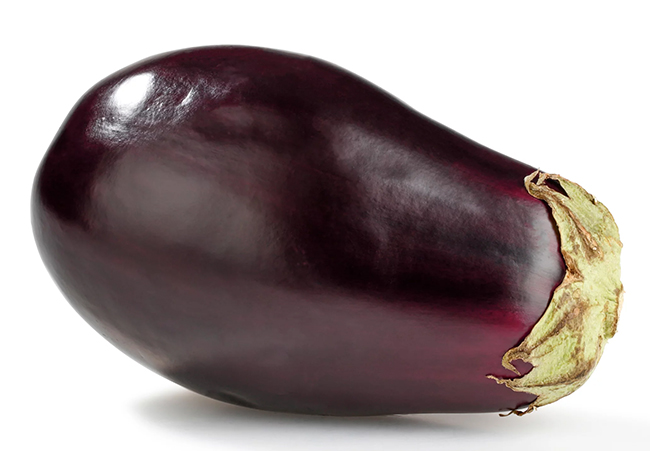
1 small eggplant cut into cubes, 1 1/2 to 2 cups
1 good sized yellow squash also cubed, 1 1/2 to 2 cups
OR use 3-4 cups of all eggplant or all squash!
3-4 tablespoons olive oil
1 heaping cup diced onions
salt and freshly gound black pepper
2 large garlic cloves, minced or put through a press
2 cups peeled & diced tomatoes or one 14 ounce can diced. Halved cherry tomatoes can also be used
2 tablespoons balsamic vinegar
1 tablespoon brown sugar 0r more to taste, depending on how ripe the tomatoes are
2 tablespoons capers, drained
For serving:
3 ounces of soft plain or honey goat cheese
8 ounces of pasta, your choice of shape
1/2 to 2/3 of the sauce
grated Parmesan
This amount of pasta will serve 2-4 people and you won’t use all the sauce. If you have a larger crowd make a whole pound of pasta and you might use all of the sauce.
Heat the olive oil in a wide deep skillet or Dutch oven. Add the squash and cook over medium high heat until softened and starting to brown. Add the onions and season with salt and pepper. Add the tomatoes, bring to a boil, then reduce heat and cook uncovered until the tomatoes have broken down and the sauce is thickened. Add the vinegar, brown sugar, and capers, taste to see if it needs additional vinegar or sugar or salt or pepper. Keep at a low bubble while you cook the pasta.
Heat a large pot of water and when it’s almost boiling, salt liberally. Add the pasta – I like shells or orecchiette for this, they kind of cup the capers. Cook until it’s a little less than the doneness you like, because it will cook more in the sauce. Drain the pasta, and return it to the pot. Ladle in about half the sauce and crumble in the goat cheese. Cover briefly to melt the cheese then stir to blend everything – and so you can tell if it needs more sauce. Serve immedfiately and pass the Parmesan. The remaining sauce can be used on another batch of pasta or if you don’t have enough, it a good bruschetta topping.
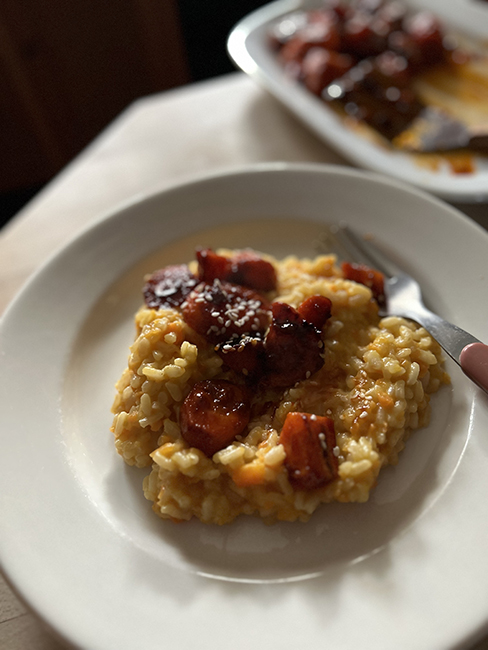
This dish is based on a recipe from the New York Times, where the carrots are roasted with chile crisp. I thought roasting the carrots with a sauce made from sweeter and slightly less hot gochujang (Korean red chili paste) might taste even better. You can see what you think! I think the carrots are good enough to enjoy all on their own, too. Be sure to roast them in a pan that holds the carrots and sauce snugly – in a larger pan the sauce may spread out and burn. If you have leftover risotto, try arancini. These cheese-stuffed rice balls are traditionally fried but can be baked as in this easy recipe, Risotto Balls (Baked Arancini) from Healthy Little Foodies.
Serves: 4 generously
Takes: about an hour
2 pounds carrots, peeled or scrubbed, divided
1 tablespoon mild tasting vegetable oil or olive oil
2 tablespoons soy sauce
1 tablespoon gochujang
1 tablespoon honey
1 tablespoon rice vinegar
1-inch piece of fresh ginger, minced or grated
5 cups chicken or vegetable stock
4 tablespoons unsalted butter, divided
1 large shallot, minced
3 garlic cloves, finely chopped
1/2 teaspoon ground coriander
1/2 cup dry white wine
1 1/2 cups/10 ounces Arborio or other short grain rice
2 1/2 ounces finely grated Parmesan (about 1 1/2 cups), plus more for serving (optional)
Kosher salt (such as Diamond Crystal) and black pepper
sesame seeds for garnish (Optional)
Heat the oven the 375°. Cut 1 pound of the carrots into rough chunks and drop into a food processor. Pulse to finely chop. You should have about 2 cups. Alternatively, the carrots can be grated if you don’t have a food processor. Cut the remaining pound of carrots on the diagonal into 1-inch pieces, and place in a small baking dish. Drizzle the oil over, toss well, and place in the oven. Roast for 10-15 minutes until just tender.
Mix the soy sauce, gochujang, honey, rice vinegar, and ginger in a small bowl or spouted measuring cup. When the carrots are almost tender, pour the sauce over, toss, and roast for another 10 minutes until tender and glazed. Set aside.
Heat the stock in a saucepan and keep warm.
Melt two tablespoons of the butter in a heavy bottomed pot that holds at least 4 quarts. Add the shallots, chopped carrots, garlic, and ground coriander and cook over medium high heat until fragrant and the vegetables are beginning to soften.
Add the wine and cook until the liquid is mostly boiled off.
Add the rice and stir until the grains of rice are well-coated with oil. Ladle in about 1 cup of warm broth and stir until it’s absorbed, about 15 minutes. Continue adding cupfuls of broth and stirring. If the rice is not tender by the time all but the last cup of broth has been added, pour in the last of the broth, stir well, and cover and simmer for 10 minutes – this is not strictly risotto technique, but should get the rice tender.
Mix in the remaining two tablespoons of butter and the cheese and stir until the risotto is creamy. Serve in shallow bowls topped with the carrots and garnished with sesame seeds, and pass extra cheese if desired.
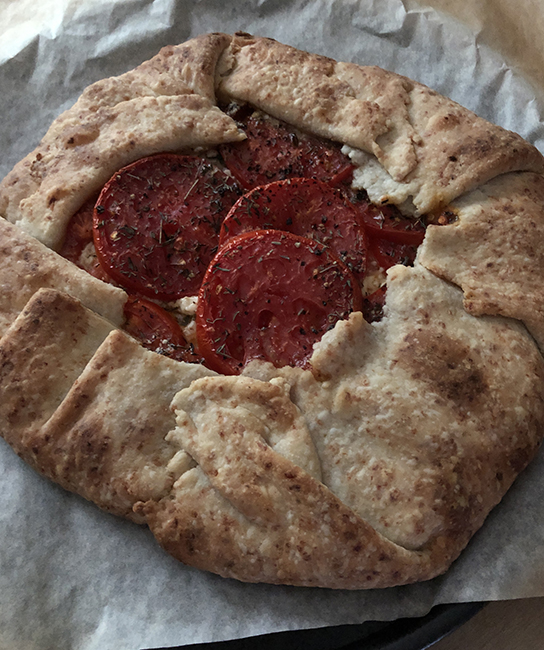
Every summer has to have its edition of tomato pie. (see the Tipi newsletter for prior pies, e.g. tomato handpies from 2021, or Smitten Kitchen’s burst tomato galette, that has corn & summer squash in the filling, or my version of Smitten’s) What makes this pie so appealing is that it avoids sogginess by keeping things simple: the filling is sliced tomatoes, feta, herbs, and shallots – that’s it!
Takes about 45 minutes to assemble and bake, plus 30 minutes to overnight to chill the crust.
Serves 6
Crust:
1 1/2 cups flour
good pinch salt, unless you’re using salted butter
2 teaspoons sugar
1/2 cup butter, either salted or un- (1 stick, 8 tablespoons)
1 tablespoon vegetable shortening or lard
1/2 cup grated Parmesan cheese
2-4 tablespoons cold water
Filling:
4-5 ounces feta cheese (a heaping cup), crumbled
1 medium shallot, finely chopped – about 3 tablespoons
1-2 tablespoon soft fresh herbs, such as basil, parsley, or thyme; or 1 teaspoon dried thyme
1 pound of tomatoes, your choice of variety, sliced about 1/4-inch thick. If you include cherry tomatoes in your mix, cut them in half
freshly ground black pepper and kosher or coarse salt for sprinkling
Make the crust: measure the flour, salt (if using), and sugar into the bowl of your stand mixer (my favorite method), your food processor, or a mixing bowl. Slice the butter and shortening over the top and combine with the flour mixture, using the paddle attachment of the mixer, by pulsing the processor, or using a pastry blender, 2 knives or your fingers, until you have a crumbly mixture with no butter lumps bigger than currants. Add the Parmesan. With the mixer or processor running, or while stirring with a fork, drizzle in the water by tablespoons, until the mixture just starts to come together in clumps. Stop before you have one big ball. Turn the crust out onto a floured surface and knead lightly to bring it together. Gather it into a ball, flatten into a disk, wrap (in plastic, wax paper, one of your reusable snack/sandwich bags), and chill for about 30 minutes, and up to 2 days.
When you’re ready to bake, place a rack in the lower middle of your oven and heat to 400°. Line a baking sheet or pizza pan with parchment paper.
On a lightly floured work surface, roll out the crust to a rough 12-inch or larger round. It’s okay if the dough isn’t perfectly round. Flop the crust in half and transfer to your parchment-lined pan – some people like to roll the dough around the rolling pin, and unroll it onto the pan. Once you have the crust in the pan, spread the feta in an even layer leaving a 2-3 inch border – think a 9-inch circle in the middle of your pan. Scatter the chopped shallot over the cheese, and add half of the chopped herbs, some salt and pepper, and lay the tomatoes on top. If you’re using cherry tomatoes, try to put the halves cut side up.
Gently fold the edges of the crust over the tomatoes, covering about 2 inches of the filling and pleating the crust as you go. Top with the rest of the herbs, and a little more salt.
Bake until the crust is golden-brown and the tomatoes are soft, about 30-45 minutes – watch that the bottom does not get too dark, and move the baking tray to a higher position in the oven if you think that’s starting to happen. Cool on the baking sheet for 5 minutes, then transfer to a wire rack to cool for 10 minutes more. Serve warm or at room temperature.
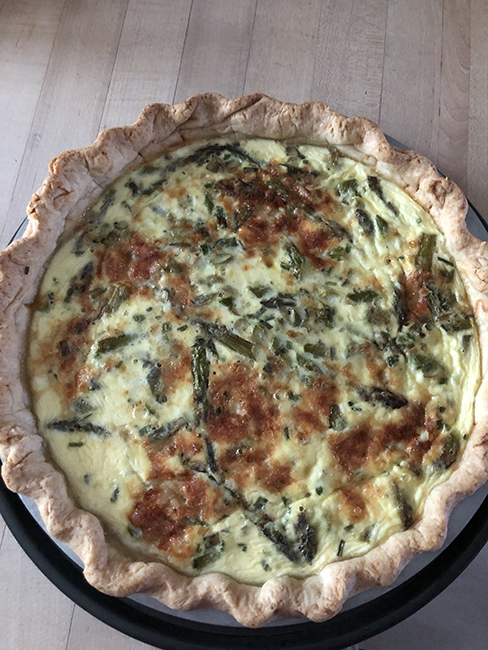
Use this formula to make vegetable – and cheese! – quiche, using just about any vegetable and cheese.
Crust:
1 1/2 cups flour (unbleached white or whole wheat)
good pinch salt, unless you’re using salted butter
2 teaspoons sugar
1/2 cup butter, either salted or un- (1 stick, 8 tablespoons)
1 tablespoon vegetable shortening or lard
1 tablespoon sugar
2-4 tablespoons cold water
Filling:
1-2 tablespoons butter or olive oil
1/2 to 1 cup chopped onion, or other onion-like vegetable – shallots, scallions, leeks, etc.
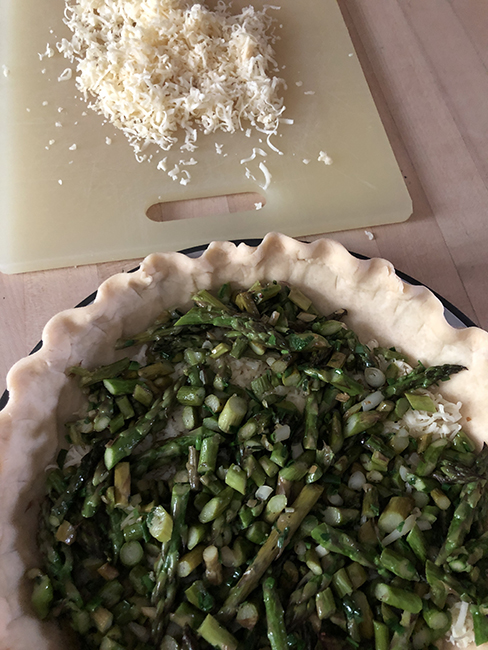
Two generous cups vegetables, cleaned and sliced, e.g. asparagus, broccoli, mushrooms, kale or other sturdy greens, etc. The exception is spinach – since it will wilt down a lot, you’ll need to start with at least half a pound and up to one pound of spinach.
salt and freshly ground pepper
1 1/2 cups grated cheese, 3-4 ounces, or similar volume crumbled goat cheese or feta
2-4 eggs
1 1/2 to 1 2/3 cups half & half, buttermilk, heavy cream, or a mixture
Make the crust: measure the flour, salt and sugar into the bowl of your stand mixer (my favorite method), your food processor, or a mixing bowl. Slice the butter and shortening over the top and combine with the flour mixture, using the paddle attachment of the mixer, by pulsing the processor, or using a pastry blender, 2 knives, or your fingers, until you have a crumbly mixture with no butter lumps bigger than currants. With the mixer or processor running, or while stirring with fork, drizzle in the water by tablespoons, until the mixture just starts to come together in clumps. Stop before you have one big ball. Turn the crust out onto a floured surface and knead lightly to bring it together. Gather it into a ball, flatten into a disk, wrap (in plastic, wax paper, one of your reusable snack/sandwich bags), and chill for about an hour, and up to 2 days.
When you are ready to assemble the quiche, if the dough has been chilling, get it out of the fridge about 15 minutes before you want to roll it out, to soften just a bit. Roll out the crust and fit it into a shallow 9-inch pie plate, metal preferred. The crust browns better in metal then glass, and tends to slip down the sides less. Set the crust in the fridge or freezer while you prepare the filling.
Make the filling: melt the butter or pour the olive oil in a 10-12 inch skillet with a lid. Add the onions and sauté over medium heat until softened but not browned, 5-10 minutes. If you are using a vegetable with harder parts, such as asparagus stalks or broccoli or chard stems, add them now. Season with salt and pepper and continue to cook until starting to soften, another 5 minutes or so. Add the rest of the vegetable, e.g. asparagus tips or broccoli florets. Cover the pan the let everything steam until the vegetables are done to your liking – they should be a little underdone than for regular eating, since they will cook again in the quiche. If you are using greens add them to the onion mixture, and cover right away to wilt. Remove the lid and cook for a few more minutes to boil off any excess liquid. remove from the heat and let cool.
Assemble the quiche: Heat the oven to 375° Get the quiche crust out of the fridge or freezer, and place it on a cookie sheet or pizza pan, dark colored (better for browning) if you have one.
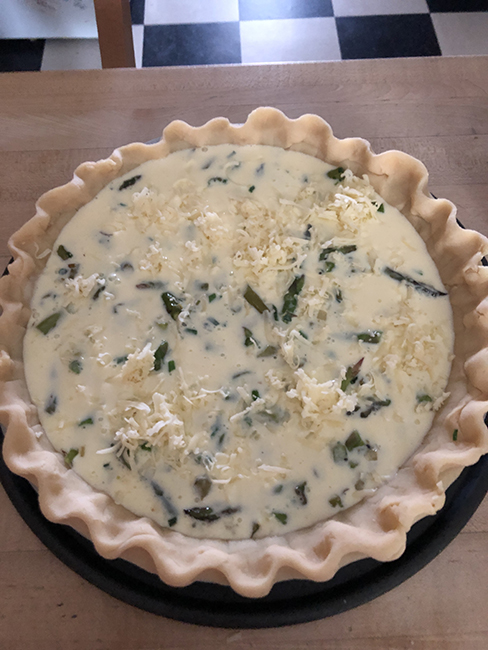
Sprinkle a layer of cheese into the bottom of the crust, reserving about 1/3 cup for topping. Beat the eggs in a spouted measuring cup that’s at least 2 cups (one pint) or larger if you have one. Add enough of whatever dairy product you are using to come to 2 1/4 cups. Add the vegetable filling on top of the cheese, and then pour in the egg mixture. Some people like to put the vegetable & cheese filled quiche onto the oven rack, and then add the egg to avoid having to walk across the kitchen with a liquid-filled quiche. If your oven racks don’t slide in smoothly you might spill the quiche at that point, however.
Bake for about 25 minutes on an upper rack then move to a lower rack and back another 20 minutes or so until puffed and golden. Allow to rest for about 15 minutes before cutting and serving. Enjoy hot or room temperature.
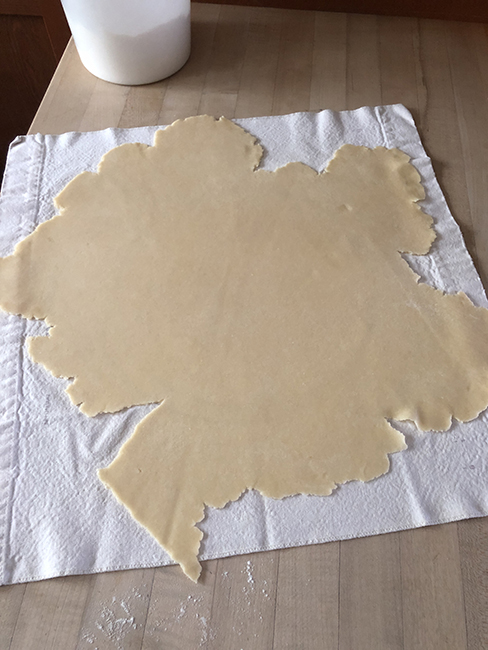
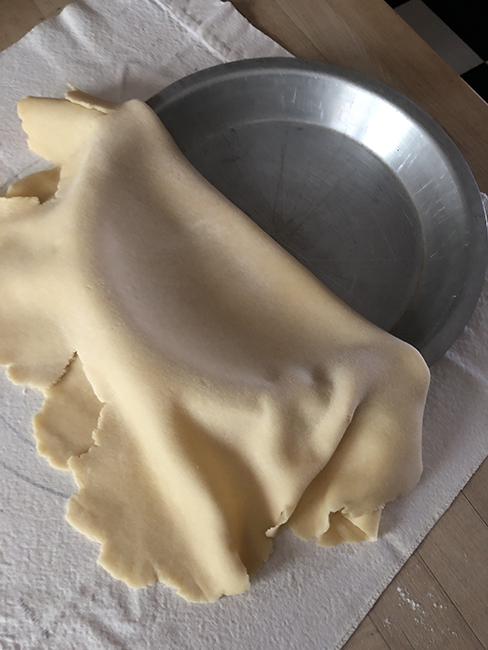
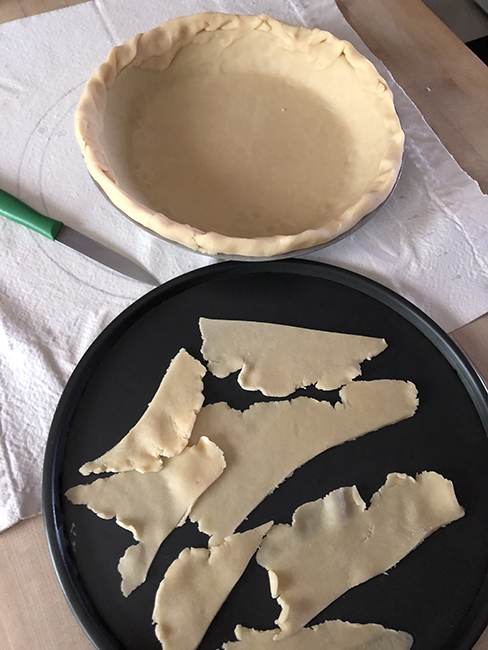
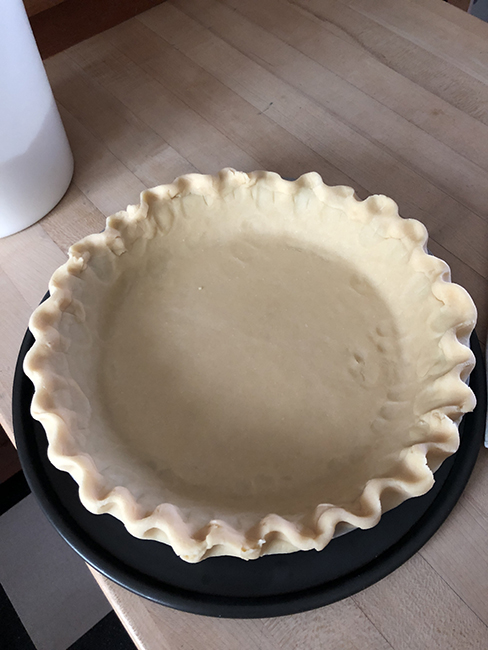
Rolled out piecrust.Flop the pie crust in half and place it in the pan. Unfold and gently fit into the pie dish.Trim the edges of the pie crust, and roll the remainder to make a neat edge. Place the trimmings on another cookie sheet. Sprinkle with cinnamon sugar and bake along with the quiche for a treat. Watch carefully – they cook fast! Done in 10 minutes or less.Crimp the edges – this pattern was made with 2 fingers and a thumb – you can also crimp the edge with a fork. Place the crust in the fridge or freezer while you make the filling.Add the cheese first, then top with the vegetables.Pour the egg mixture over the vegetables, and sprinkle on a little extra cheese.
Sauce:
1/3 cup soy sauce
2 tablespoons Hoisin sauce
1-2 tablespoons dark brown sugar
1 tablespoon sherry or white wine (optional)
1 tablespoon sesame oil
1/2 cup chicken or vegetable stock or water
1-2 tablespoons cornstarch
Optional – pinch red pepper flakes or a good squirt of chili-garlic sauce, like Siracha
Stir Fry:
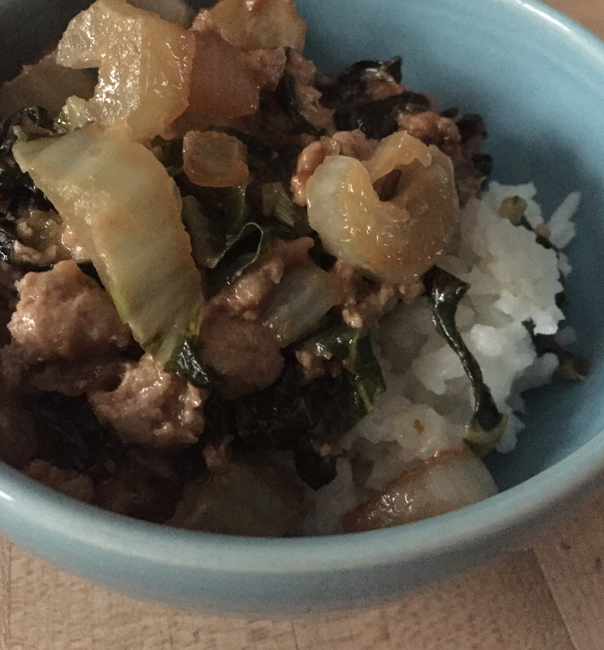
1 pound ground turkey, or pork, or a 12-14 ounce package of tofu
1 cup onion, sliced pole to pole
2 garlic cloves minced or put through a press
4 cups sliced bok choy, leaves and stems separated
1-2 frying peppers, thinly sliced
Optional – in lieu of red pepper flakes in the sauce, 1 jalapeño, finely chopped
1-2 tablespoons vegetable oil
First, put the rice on to cook.
Then, mix up all the sauce ingredients, except the cornstarch.
Heat 1 tablespoon of the vegetable oil in a wide deep skillet or wok, and brown the turkey (or pork). Add about half of the sauce to the pan, when the meat is almost done. If you are using tofu, crumble it, and brown it, and then add the sauce when it is browned on all sides. Transfer the mixture to a bowl or plate, and wipe out the skillet.
Add another tablespoon of the vegetable oil to your skillet, and stir fry the veggies in the order given: onion, garlic, bok choy, peppers. When the vegetable are almost done, add the protein mixture back into the pan. Mix the cornstarch into the sauce and add that, stirring so that everything is glazed nicely as it thickens.
1 pound potatoes, scrubbed but not peeled, cut into 1-inch cubes (about 3 large potatoes)
Kosher salt
2 tablespoons vegetable oil, divided
1 pound chorizo or turkey chorizo, or vegan chorizo
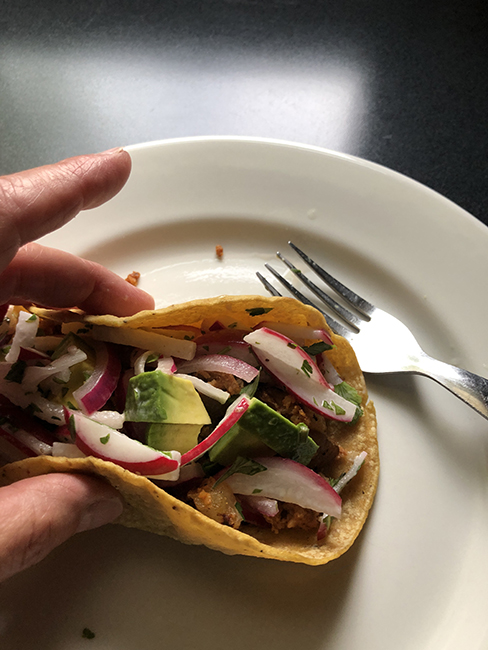
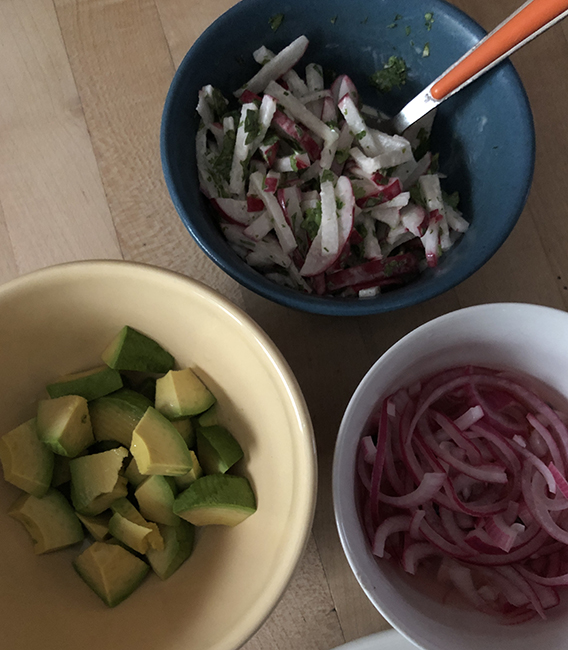
5-6 radishes cut into matchsticks
1/4 cup chopped fresh cilantro
juice of half a lime
2 teaspoons sugar, divided
2 tablespoons mayonnaise
2 tablespoons rice or cider vinegar
half a purple onion
1 bay leaf
5-6 pepper corns
kosher salt and freshly ground black pepper
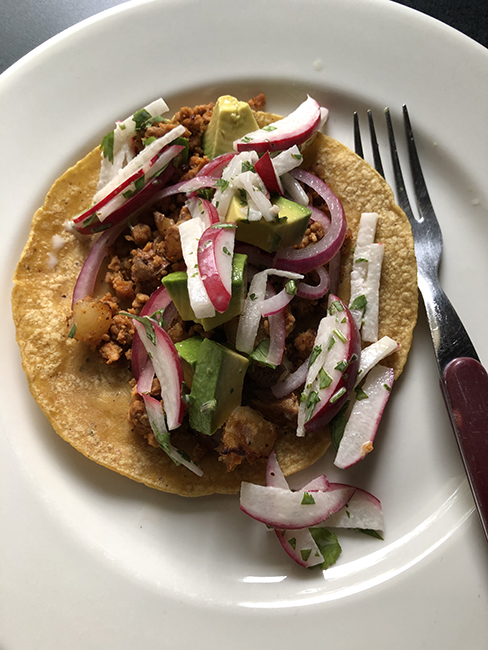
6-8 warm soft corn tortillas
Optional: Homemade or store-bought salsa, avocado, and sour cream for serving
Heat the oven to 400°. Place the potatoes in a bowl, and toss with 1 tablespoon of the vegetable oil, few good pinches of the kosher salt, and freshly ground pepper. Transfer to a baking sheet lined with parchment, and roast in the oven until they’re nice and crispy, about 20 minutes.
Put the radishes and cilantro into a bowl with a pinch of salt. Mix 1 teaspoon of the sugar, mayonnaise, and lime juice, pour in, and toss, grind in some black pepper and taste for seasoning. Set aside till serving.
Put the sliced purple onion, bay leaf, and pepper corns into a small bowl. Combine the vinegar and the remaining teaspoon of sugar in a spouted glass measuring cup. Heat in the microwave for about 40 seconds to a minute to dissolve the sugar, and pour over the onion. Set aside to pickle until serving.
Heat remaining 1 tablespoon oil in a medium non-stick or cast iron skillet, and add chorizo and cook, stirring, and breaking up the meat with a spoon. Continue cooking, stirring and tossing frequently, until all the liquid has evaporated, the chorizo starts sizzling, and eventually is quite dry and well-browned, about 15 minutes.
Transfer the potatoes to the pan with the cooked chorizo. Toss to combine and check seasoning. Serve chorizo and potato mixture immediately with tortillas, slaw, and pickled onions, and optional toppings.
Note: you can heat the tortillas in the microwave, wrapped in a dish towel, or heat them in the basket of vegetable steamer.
This recipe is for that time in the summer, when you are drowning in zucchini – it uses A LOT! It’s all over the Internet; find it on Food52, Smitten Kitchen has a version, and other places online. I am lucky enough to have it my mother’s original Mastering the Art of French Cooking, Vol. 2, published in 1970 (although my mother’s says seventh printing, 1973 – I was 18). I’ve updated the directions and made them a little more straightforward (IMHO), although I did leave out some of Julia’s edicts to taste, carefully, or critically, another of her favorite adverbs.
2 to 2 1/2 pounds zucchini
2 teaspoons kosher salt
1/2 cup white rice
3 to 4 tablespoons olive oil
1 cup minced onions
2 large cloves garlic, mashed or put through a press
2 tablespoons flour
2 1/2 cups warm liquid: zucchini juices plus milk
2/3 cup grated Parmesan cheese, divided
Salt and freshly ground pepper to taste
about 2 additional tablespoons olive oil
Grate the zucchini and place it in a colander set over a bowl. Toss with the kosher salt and set aside to drain for about 30 minutes.
Fill a saucepan that holds at least two quarts about 2/3 full with water, and bring to a boil. Drop the rice in, let it come back to a boil, and boil for 5 minutes. Drain and set aside.
Heat the 3-4 tablespoons olive oil in a wide skillet, add the onions and garlic and cook gently over medium heat until translucent and soft but not brown, about 10 minutes, then raise the heat for a few minutes and lightly brown.
Heat the oven to 425°.
Squeeze the juices out of the zucchini with your hands, reserving the liquid in the bowl under the colander, and transfer the zucchini to a clean dish towel. Wrap the towel around the zucchini and twist to squeeze more juice out, into the colander/bowl. Dump the zucchini into the skillet and stir to combine with onions and garlic. Sprinkle in the flour, and stir to combine well.
Measure the zucchini liquid and add milk to make 2 ½ cups. Heat the liquid in the microwave, and pour slowly into the skillet. Stir well, bring to a boil, and stir until slightly thickened.
Remove the skillet from the heat and stir in all but 2 tablespoons of the Parmesan cheese and the rice. Transfer the mixture to a well buttered, 2-quart, shallow, baking dish. Sprinkle with the remaining Parmesan cheese, drizzle with olive oil, and bake in the 425 oven until nicely browned, bubbling, and the rice has absorbed all the liquid – about 20-30 minutes. If you bake it a little too long it gets a brown crust on the bottom that is delicious.
Not that I would ever abandon my standard baked mac & cheese, but sometimes you want a creamy stove top version. It’s become one of those sort of full circle things in my life, that when my kids were little of course they wanted box mac & cheese, not home made – although we had all natural Annie’s, rather than Kraft – but as they got older, they started liking mine, and now not only does my older son make his own version of my mac & cheese, he’s shared the recipe with all his friends, too.
I first tried a stove top mac that was too sauce-y, too much roux and thick sauce to noodle, so I was interested to try this recipe since it had less roux and you add a measured amount of water, then the milk, then the dry pasta, and cook it until the noodles are done and have soaked up all the water. Then you add the cheese.
Ingredients (for 4 servings):
1 tablespoon butter
1 tablespoon flour
1 cup warm water
1 3/4 cups milk, warmed
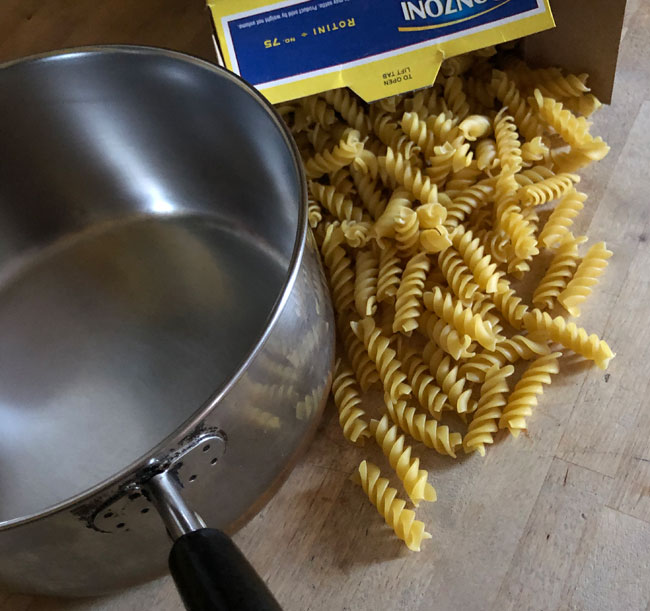
1/2 pound macaroni or pasta of your choice
1 teaspoon salt
2 1/2 cups shredded cheese – again your choice – when I tested this recipe I used white cheddar, Swiss, a kind of spicey smoked cheddar with a bit of chipotle, and Parmesan
Additional salt & pepper to taste, and you can play around with the seasoning – I often put in a bit of nutmeg, and dry or prepared mustard, and some hot seasonings like cayenne would not be out of place
Melt the butter in a heavy bottomed sauce pan that holds at least 2 quarts. Add the flour and blend, then whisk in the water, and then the milk. Add the dry pasta and the salt. Bring to a simmer, then partially cover and cook for 8-10 minutes until the pasta is cooked and liquid is mostly absorbed. Uncover and add the grated cheese and any additional seasonings. Stir well and serve.
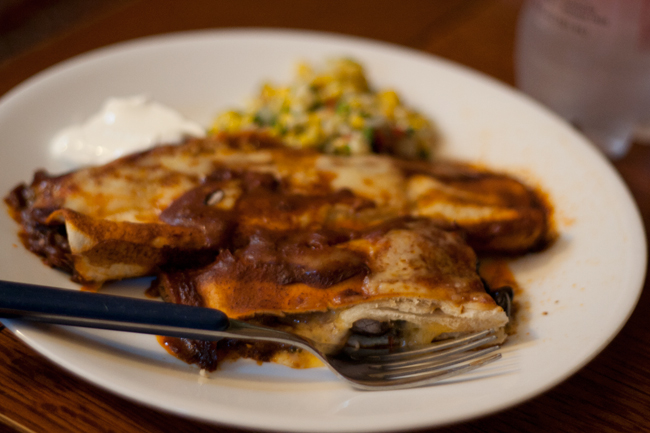
These are based on a Martha Stewart recipe from her now defunct mag, Everyday Food. June 2006, to be precise. But of course I don’t make them exactly as Martha instructs, because we all know that rarely works. My personal theory is that most Martha Stewart recipes have at least one wonky instruction, to ensure that the dish only comes out right for Martha herself. In this recipe, there’s an extra 3/4 cup water in the sauce, which makes it too thin and bland. It also calls for corn tortillas and tells you to fry them before rolling, which may be more traditional, but is a lot harder to manage than using flour tortillas, and simply microwaving them for a few seconds until pliable.
Here the enchiladas are filled with beef, but I have used all kinds of fillings successfully: chicken, beans, roasted potatoes or sweet potatoes or squash, corn, peppers … black bean & corn is a favorite.
Beef enchiladas
Black bean enchiladas
For the sauce:
2 tablespoons vegetable oil
1/4 cup flour
2 cups vegetable or chicken broth, preferably home made OR one 14.5 oz. can of broth plus enough water to make 2 cups (about 2-3 tablespoons)
1 1/2 tablespoons chili powder (I often use part chili powder and part ground Ancho chile)
1 chile from a can of chipotle chiles in Adobo sauce, plus a few spoons of the sauce
1-3 tablespoons of tomato paste
1 tablespoon brown sugar
salt and freshly ground black pepper
For the filling:
1 pound lean ground beef
1/3 cup finely chopped onion
salt and freshly ground black pepper
For assembly:
6-8 flour tortillas
1/2 pound cheddar cheese, shredded
Make the sauce: measure the oil and flour into a sauce pan and whisk to combine. Heat the broth in the microwave – a spouted glass measuring cup works well for this – and pour it into the pan while whisking until smooth and thickened. Add the chili powder, Adobo chile and sauce, tomato paste, and brown sugar and whisk until smooth. Simmer the sauce for about 10 minutes. Season with salt and pepper.
Make the filling: Brown the ground beef in a skillet, breaking up the clumps with a wooden spoon. Add the onion and cook, stirring, until there’s no pink left in the meat and the onion is translucent. Season with salt and pepper.
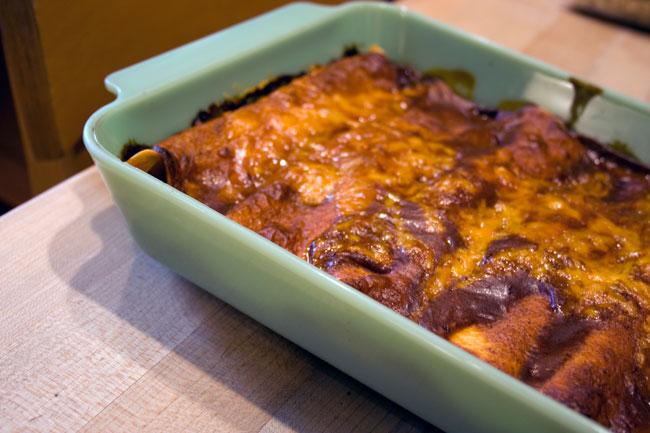
Assemble the enchiladas: Heat the oven to 375°. Microwave the tortillas briefly to make them flexible. Pour a thin layer of sauce into the bottom of a 13 x 9 baking dish. Fill each tortilla with a big spoonful of meat filling, top with a few big pinches of grated cheese (reserving about 1/2 a cup of cheese for topping), tuck the sides in, and roll neatly. Place the enchiladas in the baking dish as they’re rolled.
Pour the rest of the sauce over the enchiladas. Place the baking dish in the oven and cook for about 20 minutes until bubbling. Top with the reserved grated cheese and return to the oven for about 5 minutes to melt the cheese. Serve the enchiladas with sour cream, chips, and salsa of your choice.
Originally published March 2018 – although I’ve been making them since the Martha recipe was published in 2006.
Which is reminding me “La fin des haricots“, the French way of saying, “It’s the end of the world“, but ironically, as we might say it about something that’s really not the end of the world, or of the beans. I learned this from Clotilde (of Chocolate & Zucchini) and her series on French idioms.
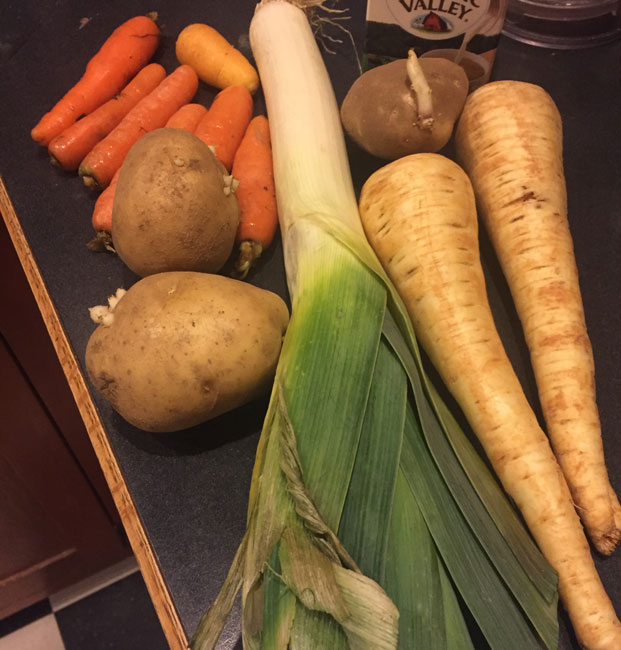
This recipe is related to bottom-of-the-vegetable-bin stirfry, in that I dug out all the soup vegetables I had from the vegetable bin and the pantry – well, I still have a celeriac and about a quarter of a head of cabbage – and made them into soup. It’s also related to Ovens of Brittany cream of [main ingredient name goes here] soup, because even though Ovens is not exactly where I learned to make cream soups, it’s definitely where I made the most cream soups, volume-wise, since our normal size batch of soup was 7 gallons.
Ingredients:
1-2 tablespoons olive or vegetable oil
white and pale green parts of one large leek, rinsed and finely sliced – one generous cup
2 parsnips, peeled, woody parts removed, and chopped – 3/4 cup
3 medium potatoes, peeled and chopped into 1 to 1 1/2 inch cubes – another generous cup, maybe a cup & a third
2/3 cup peeled and chopped carrots
3-4 cups broth, home made preferred, but you can use soup base and water, or even plain water (I had some from the summer made from dill and corn cobs)
2 tablespoons butter
1/4 cup flour
2 cups milk, half & half, or a mixture (I half half & half and half 2% milk – that’s a lot of halfs)
kosher salt and freshly ground black pepper.
Pour the olive oil into a large pot that holds at least 4 quarts, and heat till fragrant. Add the leeks and some salt and pepper, give them a stir, and let them cook gently over medium heat while you chop up the rest of the vegetables. Add the parsnips, potatoes, and carrots, and continue to cook over medium heat until softened and starting to brown. They might start sticking a little bit, don’t worry about that – they’ll come loose when you add the broth.
Add the broth, making sure you have enough to cover all the vegetables – add water if necessary. Raise the heat until the mixture comes to a boil, then reduce the heat and cover and simmer until all the vegetables are soft, probably 15 minutes. In my experience the carrots take the longest, oddly.
Make the roux while the vegetables cook: melt the butter in a small skillet. Add the flour, and cook and stir for a few minutes until there’s no raw flour smell.
When the vegetables are all cooked, stir in the (cooled) roux, and keep stirring while the mixture thickens, to ensure there won’t be any lumps. Mix the half & half and milk in a spouted glass measuring cup, heat it to just slightly warm in the microwave, and add it to the soup. Heat gently, try not to boil it after you’ve added the dairy, add more salt and pepper, and serve.