Kaffee Keksee = Coffee Biscuits

Thanks to Lisbeth, and Molly, for this recipe.

Ingredients:

  • Dough:
  • 125 g (1 stick plus 1 tablespoon) cold, unsalted, butter
  • ⅔ cup granulated sugar
  • Pinch of kosher salt
  • 2½ cups unbleached flour
  • ½ teaspoon cinnamon
  • ½ tsp cardamom
  • 1 teaspoon vanilla or vanilla bean paste
  • 1 egg
  • Coffee ganache filling:
  • ½ cup heavy cream
  • 4.25 ounces of good dark chocolate, like Scharffen Berger, finely chopped
  • 1 shot of brewed espresso (or 2 teaspoons espresso powder dissolved in a shot glass of water)

Assembly:

Make dough:
Combine the butter, sugar, salt, flour, and spices in a food processor. Pulse until the mixture resembles fine meal. Mix the egg and the vanilla, pour the mixture into the food processor on top, and pulse until you have a dough. Form the dough into a disk and wrap in wax paper. Chill it for at least 30 minutes and up to overnight.

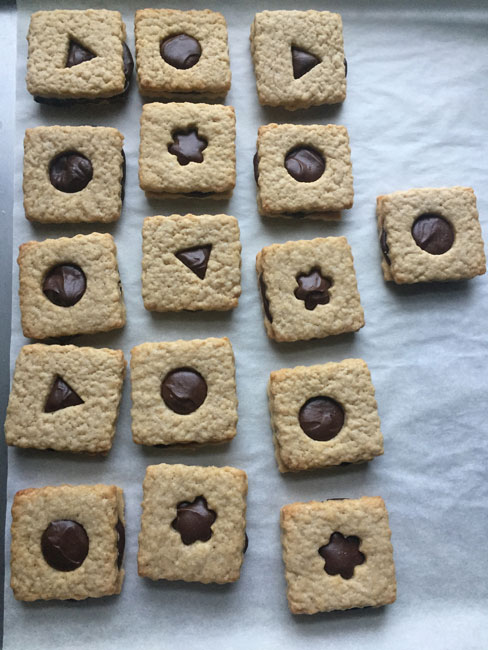
Heat the oven to 375°. Line one or two large baking sheets with parchment. Roll out the dough on a floured work surface; don’t make it too thin. Cut the dough into shapes with a 2-3 inch cutter. Cut out a shape from the center of half the cookies – Lisbeth used a moose; I used circles and diamonds, and a few flowers.

Place the cookies on the sheets and bake for 8 – 10 minutes.

Cool completely – about two hours or overnight.

Make coffee ganache filling:

In a saucepan, bring the cream to a boil with the espresso. Add the chopped chocolate and let it rest for a few minutes, then mix until smooth. Cool until it’s thick enough to spread – you can put the pan into a bowl of ice water and stir until the filling is the right consistency, if you are impatient like me.

Optionally, dust the top cookies with cocoa or powdered sugar.  Place a generous smear (2-3 teaspoons) of ganache filling on the underside of the cookies without cutouts, place a cutout cookie on top, press gently, and let set for at least two hours to firm up.

The cookies will keep in a covered container at room temperature for at least a week.

Originally posted – NEW in 2018

My version of Farm Cakes

The Ovens of Brittany bakery used to sell a chocolate muffin/cupcake with a cream cheese and chocolate chips stuffing, and they were called Farm Cakes. For a while in the 1980s, one of the Ovens bakers managed the bakery at one of the Steep & Brew Coffee cafes, and they sold them, too.

Here’s my version of Farm Cakes, using a hand mixed, mayo-for-shortening, chocolate cake. The best thing to use to mix up the batter is the type of flat whisk shown below – it’s for angel cake, to fold the egg whites in, but it’s also a good all-purpose mixer.

Cake:

2 cups sugar
1 cup unsweetened cocoa
1 cup cold coffee (can use decaf)
2 eggs, 1 separated
1 tsp vanilla
1/2 tsp almond extract
2 tsp. baking soda
1/2 tsp. salt
2 cups flour
1 cup mayo (can use reduced fat)

Combine the sugar and cocoa in a large bowl. Stir the extracts into the coffee, then add about half the coffee mixture to the sugar and cocoa, and mix until smooth. Add the rest of the coffee. Beat in one whole egg and the white of the separated egg, add the mayo, beat till smooth, and then measure the baking soda and salt onto the top of the mixture in your bowl. Pour the flour on top, and mix well.

Filling:
2/3 of an 8-oz. bar of cream cheese (about 6 oz.), softened
2/3 cup of mini chocolate chips
1 egg yolk
A few drops of almond extract (optional)

Place the cream cheese in a bowl, add the chocolate chips, egg yolk, and extract if you’re using it. Mash together.

Preheat the oven to 350°. Line about 18 wells in two muffin pans with paper liners. Fill muffin cups 3/4 full. Drop about 2 tsp of filling into each muffin. Bake for 25-30 minutes, until firm.

Note: It might be wise to grease the tops of your muffin tins, or be sure to loosen the cakes when they are still warm, because in testing these in 2018, using these amounts of batter and filling, I got 20 cakes with significant muffin tops! That is batter that spread over the tops and could stick to the tin.

Originally posted around 2010; based on a recipe from the 1980s

Farm Cake with muffin top

Lime & white chocolate blondies

1/2 cup butter or vegetable shortening
2 cups brown sugar, lightly packed
2 large eggs
2 teaspoons vanilla extract
1/2 teaspoon salt
1 3/4 cup unbleached all-purpose flour
2 teaspoons baking powder
12 – 15 oz. white chocolate coarsely chopped – or 1 1/2 – 2 cups white chocolate chips
2 – 3 oz. unsweetened chocolate finely chopped
1 cup diced toasted pecans
grated zest and juice of one lime

Lightly grease a 9 x 13-inch pan and preheat your oven to 350°F. Melt the butter in a medium-sized saucepan. Add the brown sugar, and stir until the mixture is smooth.

Remove the pan from the heat, pour the butter-sugar mixture into a medium-sized bowl, and allow it to cool to lukewarm. Whisk in the eggs one at a time. Stir in the vanilla extract, salt, and baking powder.

Measure the flour into the bowl, top with the chopped chocolates and nuts, and stir to combine. Finally, fold in the lime zest and juice.

Spread the mixture evenly in the pan, and bake the blondies for 30 to 35 minutes, until they’re light brown on the edges and top. Yield: about 2 dozen 2-inch squares, but you can cut them smaller.

Originally posted April 2013

Blueberry Muffins

We had an AFS student from Germany the 2013-14 school year, and her parents and little sister came to pick her up in July. They’ll travel for about 2 weeks in the US before going home. Their last morning here, I made blueberry muffins for breakfast. They asked for the recipe, and it made me realize I have never really done my blueberry muffin recipe. It’s changed over the years influenced by this and this, but usually with butter rather than oil, and cinnamon, and the crumbcake method, of cutting the butter in first, a little richer than my “everyday” muffins.

And now, 10 years later (January 2024) I tried out a whole wheat version that is proving quite popular.

Ingredients:

  • 2 1/2 cups of flour
  • 1 cup granulated sugar
  • 1 tsp salt
  • 2 tsp. baking powder
  • 1 tsp. cinnamon
  • 1 stick, 8 TBLS, 4 oz. butter
  • 1 egg
  • 1 cup 2% milk
  • 2 cups blueberries, fresh or UN-thawed frozen (1 pint basket)

Heat the oven to 375°. Grease the wells of a 12-well muffin tin, or line with paper liners. Measure the flour, sugar, salt, baking powder, and cinnamon into a large mixing bowl – or the bowl of your stand mixer. Slice in the butter. Cut the butter into the flour mixture, with the paddle attachment of your mixer, or a pastry blender, or your fingers, until you have what looks like coarse meal. Remove 12 TBLS about 8 TBLS – half a cup – of the crumbs and set aside for topping. Make a well in the center for the dry ingredients, and break in the egg, and our in the milk. If you were using the mixer before, do this part by hand with a rubber (silicone, really, probably) spatula. When all the dry goods are wetted down, add the blueberries, and mix gently just till everything is combined. Scoop the batter into the muffin tin, dividing evenly (A muffin scoop is great for this). Top each muffin with a sprinkle of the reserved crumbs. Bake 15 – 20 minutes until raised, firm and lightly browned.

Originally published June 2014 – edited Feb. 2019

Enchiladas

These are based on a Martha Stewart recipe from her now defunct mag, Everyday Food. June 2006, to be precise. But of course I don’t make them exactly as Martha instructs, because we all know that rarely works. My personal theory is that most Martha Stewart recipes have at least one wonky instruction, to ensure that the dish only comes out right for Martha herself. In this recipe, there’s an extra 3/4 cup water in the sauce, which makes it too thin and bland. It also calls for corn tortillas and tells you to fry them before rolling, which may be more traditional, but is a lot harder to manage than using flour tortillas, and simply microwaving them for a few seconds until pliable.

Here the enchiladas are filled with beef, but I have used all kinds of fillings successfully: chicken, beans, roasted potatoes or sweet potatoes or squash, corn, peppers … black bean & corn is a favorite.

For the sauce:

  • 2 tablespoons vegetable oil
  • 1/4 cup flour
  • 2 cups vegetable or chicken broth, preferably home made OR one 14.5 oz. can of broth plus enough water to make 2 cups (about 2-3 tablespoons)
  • 1 1/2 tablespoons chili powder (I often use part chili powder and part ground Ancho chile)
  • 1 chile from a can of chipotle chiles in Adobo sauce, plus a few spoons of the sauce
  • 1-3 tablespoons of tomato paste
  • 1 tablespoon brown sugar
  • salt and freshly ground black pepper

For the filling:

  • 1 pound lean ground beef
  • 1/3 cup finely chopped onion
  • salt and freshly ground black pepper

For assembly:

  • 6-8 flour tortillas
  • 1/2 pound cheddar cheese, shredded

Make the sauce: measure the oil and flour into a sauce pan and whisk to combine. Heat the broth in the microwave – a spouted glass measuring cup works well for this – and pour it into the pan while whisking until smooth and thickened. Add the chili powder, Adobo chile and sauce, tomato paste, and brown sugar and whisk until smooth. Simmer the sauce for about 10 minutes. Season with salt and pepper.

Make the filling: Brown the ground beef in a skillet, breaking up the clumps with a wooden spoon. Add the onion and cook, stirring, until there’s no pink left in the meat and the onion is translucent. Season with salt and pepper.

Assemble the enchiladas: Heat the oven to 375°. Microwave the tortillas briefly to make them flexible. Pour a thin layer of sauce into the bottom of a 13 x 9 baking dish. Fill each tortilla with a big spoonful of meat filling, top with a few big pinches of grated cheese (reserving about 1/2 a cup of cheese for topping), tuck the sides in, and roll neatly. Place the enchiladas in the baking dish as they’re rolled.

Pour the rest of the sauce over the enchiladas. Place the baking dish in the oven and cook for about 20 minutes until bubbling. Top with the reserved grated cheese and return to the oven for about 5 minutes to melt the cheese. Serve the enchiladas with sour cream, chips, and salsa of your choice.

Originally published March 2018 – although I’ve been making them since the Martha recipe was published in 2006.

Pear Cake

Pears on the counter for pear cake

This was one of my three go-to desserts when my kids were little – that I could make when I got home from work, and we almost always had what we needed in the house, and they could be devoured as soon as they were ready. The others were camel cussert (caramel pudding) and ginger bread.

2-3 pears depending on size
4 tablespoons unsalted butter
1/2 cup light or dark brown sugar
1/3 cup vegetable oil – or another 6 tablespoons butter, melted
1/4 – 1/2 white sugar
1 egg
1 1/2 cups of flour
1 teaspoon baking powder
1/2 teaspoon baking soda
2 teaspoons ginger (or 2-3 tablespoons chopped crystallized ginger)
1/2 teaspoon salt
3/4 cup plain or vanilla yogurt

Melt the 4 tablespoons butter in a small saucepan, and add the brown sugar. Stir until the nicely blended and smooth, and pour the mixture into a buttered or greased 9 x 9 square baking dish. Peel the pears, core, and slice them, and arrange the slices over the brown sugar. Place the oil or melted butter in a mixing bowl, and add the white sugar – use the half cup if you are using plain yogurt, and less if using vanilla. Mix well, and add the egg, then add the, leavening, salt and ginger. Mix in the yogurt, and the flour, and spread over the pears. Bake for about 25 – 30 minutes in a 350° oven. Cool in the pan for about 10 minutes then turn out onto a serving platter large enough to catch any drips.

Can also be made with apples.

Pear cake for work breakfast

Originally published October 2011

Recipe for a curiously satisfying breakfast

  • 1/3 cup rolled oats
  • 2 medjool dates
  • 1 large banana

Optional additions: small spoonful of brown sugar, splash of 2% milk, a jar of good peanut butter

Put the oats in a small saucepan with 2/3 cups water and a pinch of salt. Pit the dates, cut them into small pieces, drop them into the pan with the oats and water, and bring to a boil over medium high heat. Reduce the heat, stir, and cook for about 3 minutes. Peel and slice about half the banana into the pan, stir again, and cook for about another 3 minutes. Turn off the heat and let the oatmeal stand for a few minutes – cover optional.

Add the optional toppings, and eat with a large spoon, straight out of the pan.

Eat the remaining half of the banana with the peanut butter.

Originally published February 2018

End of the CSA Potato Soup

Which is reminding me “La fin des haricots“, the French way of saying, “It’s the end of the world“, but ironically, as we might say it about something that’s really not the end of the world, or of the beans. I learned this from Clotilde (of Chocolate & Zucchini) and her series on French idioms.

This recipe is related to bottom-of-the-vegetable-bin stirfry, in that I dug out all the soup vegetables I had from the vegetable bin and the pantry – well, I still have a celeriac and about a quarter of a head of cabbage – and made them into soup. It’s also related to Ovens of Brittany cream of [main ingredient name goes here] soup, because even though Ovens is not exactly where I learned to make cream soups, it’s definitely where I made the most cream soups, volume-wise, since our normal size batch of soup was 7 gallons.

Ingredients:

  • 1-2 tablespoons olive or vegetable oil
  • white and pale green parts of one large leek, rinsed and finely sliced – one generous cup
  • 2 parsnips, peeled, woody parts removed, and chopped – 3/4 cup
  • 3 medium potatoes, peeled and chopped into 1 to 1 1/2 inch cubes – another generous cup, maybe a cup & a third
  • 2/3 cup peeled and chopped carrots
  • 3-4 cups broth, home made preferred, but you can use soup base and water, or even plain water (I had some from the summer made from dill and corn cobs)
  • 2 tablespoons butter
  • 1/4 cup flour
  • 2 cups milk, half & half, or a mixture (I half half & half and half 2% milk – that’s a lot of halfs)
  • kosher salt and freshly ground black pepper.

Pour the olive oil into a large pot that holds at least 4 quarts, and heat till fragrant. Add the leeks and some salt and pepper, give them a stir, and let them cook gently over medium heat while you chop up the rest of the vegetables. Add the parsnips, potatoes, and carrots, and continue to cook over medium heat until softened and starting to brown. They might start sticking a little bit, don’t worry about that – they’ll come loose when you add the broth.

Add the broth, making sure you have enough to cover all the vegetables – add water if necessary. Raise the heat until the mixture comes to a boil, then reduce the heat and cover and simmer until all the vegetables are soft, probably 15 minutes. In my experience the carrots take the longest, oddly.

Make the roux while the vegetables cook: melt the butter in a small skillet. Add the flour, and cook and stir for a few minutes until there’s no raw flour smell.

When the vegetables are all cooked, stir in the (cooled) roux, and keep stirring while the mixture thickens, to ensure there won’t be any lumps. Mix the half & half and milk in a spouted glass measuring cup, heat it to just slightly warm in the microwave, and add it to the soup. Heat gently, try not to boil it after you’ve added the dairy, add more salt and pepper, and serve.

Originally published January 2018

Rhubarb Strawberry Pie

I’ve been using a recipe I adapted from a book called American pie : slices of life (and pie) from America’s back roads, by Pascale Le Draoulec. It uses flour for thickening, which I like with rhubarb.

Crust for a 2-crust pie*
1 1/2 cups chopped rhubarb
2 cups halved strawberries (can be frozen – we rarely have rhubarb & strawberries at the same time in WI, and when the fresh strawberries come in, seems a shame to bake them!)
1/4 cup flour
2 TBLS cornstarch
1 1/2 cups sugar
pinch of salt – or use salted butter
1 TBLS butter, approximately

Preheat the oven to 400°. Combine the rhubarb and the strawberries in a bowl. Mix the flour, sugar, cornstarch and salt, if using. Roll out the bottom crust and ease it into the pie dish. Put 1/4 cup of the flour mixture in the bottom crust and spread it around. Set the crust in the fridge. Add the rest of the flour mixture to the fruit and toss well. Roll out the top crust and cut it into strips – with a decorative cutter if you have one – the one I use is actually for making the ruffled edges of lasagna noodles. Toss the fruit again, and pour it into the bottom crust – it helps to take it out of the fridge at this point. Dot the fruit with small pieces of butter. Weave the crust strips into a lattice – the American pie book has explicit instructions on page 345 – or just use what you remember from making woven potholders for your mom. Bake the pie for 10 minutes then reduce the heat to 375°. Bake for about another 50 minutes, until the filling is bubbling. Cover loosely with foil if the crust browns too fast. let cool at least 1 hour and eat with vanilla ice cream.

*I have always used my mom’s recipe – 3 cups flour to 1 cup butter, with 1 TBLS sugar per cup of flour for a sweet pie. And I tended to use unsalted butter, which makes a good tasting, but not flakey crust. For flakes you need shortening or lard. Recently I’ve been playing around with both the proportions, and the type of fat – mom used salted margarine – and I have decided that I like the original proportions, but with salted butter, plus two TBLS vegetable shortening. Also recently, I like Earth Balance better than Crisco. I guess that’s not so blasphemous – even my mom, born and raised in Cincinnati – both her Dad & brother worked for P&G – thought that Crisco was suitable for greasing pans, not eating. And P&G spun off the Crisco brand in 2002, along with Smuckers & Jif.

Originally published summer 2012 … I think

Spicey Peanut Dip

  • 1 3/4 cups peanut butter, smooth commercial type works better than all-natural (even cheaper store brands, rather than major label)
  • approx. 1 TBLS vegetable oil
  • a few drizzles of Asian roasted sesame oil
  • 2 cups chopped onion
  • 6 cloves garlic (I use dry roasted garlic; put unpeeled cloves in a dry cast iron frying pan over high heat, and shake intermittently until they smell toasty and there are burnt spots on the skins, then cool and peel)
  • 6 TBLS lemon juice or rice vinegar
  • 1/2 bunch fresh cilantro
  • about 1 TBLS peeled fresh ginger)
  • 1 TBLS soy sauce
  • 2 tsp. dried red pepper flakes
  • 2 tsp. curry powder

Pour the vegetable oil into a wide deep skillet, and heat. Cook the onions in the oil over medium low heat until they are translucent, but not brown. Drizzle in the sesame oil. Cool slightly. Place cooked onions, garlic, cilantro, and ginger in bowl of food processor and pulse until finely chopped. Add remaining ingredients and process until smooth, adding hot water to thin if necessary.