Cheesy Zucchini Enchiladas

This is more of a formula than a recipe, really. I made these while trying to clear out the fridge before going on vacation, so the filling and sauce are made from what I had. If you have more time, you could use the sauce from this enchilada recipe, or this ranchero sauce would also be good to smother your enchiladas. You could even use canned enchilada sauce. Suggested add-ins for the filling would be corn kernels or black or pinto beans.

Sauce
1 tablespoon olive oil
1 cup cherry or grape tomatoes
1/2 cup chopped onions
1/2 cup diced red bell pepper
1 medium jalapeño, finely diced, seeds removed if you want less heat
1-3 teaspoons medium chili powder
1 teaspoon smoked paprika
salt and freshly ground pepper to taste
2 cups or 1 14-oz. can diced tomatoes
1/2 cup canned tomato sauce
a generous handful, about 1/3 cup chopped cilantro leaves

Filling
1 tablespoon olive oil
two medium zucchini or summer squash or a mix of both, about 3/4 to 1 pound total
salt and freshly ground pepper to taste
2-3 scallions, thinly sliced
3 cups grated cheese, such as a combination of cheddar and pepper jack or mozzarella

4 to 6 8-inch flour tortillas

Make the sauce: Pour the olive oil into a wide deep skillet over medium high heat. Add the cherry tomatoes and cover. Cook, shaking the pan from time to time, for about 5-8 minutes until your hear the tomatoes popping. Lower the heat to reduce spattering, remove the lid, and crush the tomatoes with a potato masher or spoon. Add the onions, increase the heat to medium, and continue cooking until the onions are softened and translucent. Add the red pepper and jalapeño pepper, and the spices and salt and pepper. Mix well. Add the tomatoes and tomato sauce and cook uncovered over medium heat until thickened. Stir in the cilantro and remove from heat.

Make the filling: Add the olive oil to a skillet over medium high heat. Add the zucchini and squash and salt and pepper cook stirring frequently until the squash is starting to brown and soften. Add the scallions, mix in, and remove from the heat.

Assemble the enchiladas: Het your oven to 375°. Heat the tortillas in the microwave, briefly, to make them more pliable (40 seconds in my microwave is about right but microwaves vary greatly). Spread a thin layer of sauce in  a baking dish – 9×9 is about right for 4 enchiladas, and 13×9 should fit 6. Add about 1/3 cup filling to a tortilla, top with about 2 tablespoons of cheese, fold the ends in and roll each enchilada, and place in the dish. Reserve about 3/4 cup cheese for topping. When you have all the enchiladas in the baking dish, cover with more sauce. Bake the enchiladas for 30 minutes, then top with the cheese. Return to the oven just to melt the cheese, about 5 minutes. Remove from the oven and serve with sour cream and salsa, if you like.

Sponge cake with strawberries & cream

This cake recipe comes from Bronwen Wyatt, @bayousaintcake, a terrific baker from New Orleans LA, who can tell you anything you need to know about Mardi Gras King Cakes, biscuits, and really all types of baked goods. It’s an all-purpose sponge cake that can be dressed up any number of ways, with mountains of cream and strawberries, as below, or as the base for a trifle or even tres leches cake. Bronwen makes this cake with olive oil, but I prefer a neutral-flavored oil like safflower. A nut oil like almond or walnut would be delicious if you are not feeding anyone with a nut allergy.

Cake
1/4 cup sugar
15 tablespoons sugar (1/2 cup with 1 tablespoon removed)
3/4 cup all purpose flour
1 teaspoon baking powder
1/2 teaspoon salt
3 tablespoons neutral-flavored oil, such as safflower
1/3 cup milk
1 teaspoon vanilla extract or vanilla bean paste
3 eggs, cold
1/8 teaspoon cream of tarter

Cream
2 cups of heavy cream
2-3 tablespoons powdered sugar
1 teaspoon vanilla

Strawberry filling
2-3 cups of strawberries
1-4 tablespoons sugar
optional: a splash of liqueur, such as Amaretto or lemon juice or Balsamic vinegar

Heat the oven to 350°. If you have an 8- or 9-inch springform pan, that works well for this cake. You don’t need to grease or line it. If you have a cake pan that’s at least 3 inches deep that will work, or a square 9-nch pan that’s deeper.

Separate the eggs, placing the whites in the bowl of a stand mixer or other bowl in which you can whip the whites. Place the yolks in a medium bowl, that will hold abut 2 quarts.

Set the smaller amount of sugar by the whites. Combine the larger amount of sugar with the flour, baking powder, and salt.

Whisk the egg yolks to break them up, then whisk in the oil. Add the milk and the vanilla, and when they’re mixed in, add the flour mixture.

Beat the egg whites and cream of tarter on medium speed till foamy, the start adding the sugar, slowly, continuing to beat until you have shiny but still moist peaks, slowly increasing the speed of your mixer as the sugar is incorporated. The process should take 3-4 minutes.

Mix about 1/3 of the whites into the batter with your whisk, then switch to a spatula, and mix in the rest of the whites in twp additions, trying not to deflate the whites.

Pour the batter into your pan and smooth the top. Bake for 25-30 minutes until the top springs back when pressed lightly and is golden brown. Invert the pan onto a rack as soon as you take it out of the oven. Cool for at least 30 minutes then cut around  the edges with a thin knife and remove the springform sides (if using) and carefully release the cake from the springform bottom. Or unmold the cake if you’re using a different pan.

While the cake is cooling prepare the cream and strawberries. Select a few of the prettiest strawberries to decorate the top pf your cake. Wash (as needed) and hull and slice the rest of the berries. Combine the berries, sugar, and optional flavorings and allow to macerate while the cake cools.

Whip the cream in a chilled bowl with chilled beaters until softly mounded, adding the sugar and vanilla towards the end, when it is near the consistency you like. For longer life, you can also use this whipped cream frosting that is stabilized with cream cheese. It will hold up in the fridge for days without going flat.

To assemble your cake, you can split it, fill it with berries and cream, and then pile more on top. You could also fill the cake with good quality jam, and pile fresh berries on top. Finally, if you aren’t serving a crowd, you can slice wedges of plain cake and cover those with berries and cream, thus reserving the cake for later.

Vegetable & [optional] Meat Pot Pie with Yogurt Biscuits

You can make this potpie vegetarian, or add meat – you’ll need 1/2 pound ground meat – beef, turkey, your favorite! The yogurt biscuits make a fluffy and crunchy topping. You can use any combination of root and other vegetables – this version has cabbage and peppers from this week’s box, plus carrots and potatoes from prior weeks. Sub in broccoli and/or cauliflower if you like! Mushrooms are suggested to replace the meat, but are optional.

Take about 1 1/2 hours including baking
Serves 6-8

Filling:
1 tablespoon oil or butter
1/2 pound group meat or mushrooms (optional)
1 tablespoon Worcestershire sauce
1 cup chopped onions
salt and freshly ground pepper
1 1/2 to 2 cups chopped cabbage, or broccoli or cauliflower
3/4 cup chopped bell pepper
2 1/2 to 3 cups root vegetables – carrots, potatoes, turnips, parsnips – peeled and chopped into bite-size pieces
1/2 cup frozen peas, thawed (optional)
2 1/2 to 3 cups liquid – suggested 2 cups veggie or chicken or beef broth, and 1/2 cup whole milk or half & half
1/4 cup flour
1 veggie or meat bouillon cube (optional)

Biscuits:
2 cups unbleached flour
1 tablespoon sugar
1 tablespoon baking powder
1/2 teaspoon baking soda
1 teaspoon fine sea salt
1 stick, 8 tablespoons, cold unsalted butter, cut into bits
1 cup plus 2 tablespoons plain yogurt, cold from the fridge

  1. Make the filling: Melt the butter or add the oil to a large, deep pot and brown the meat or mushrooms, if using. Add the onions and season with salt & pepper. If you’re not using meat or mushrooms, add the oil or butter to the pot and add the onions. Cook until the onions are translucent, about 10 minutes. Add the cabbage or broccoli or cauliflower, and the peppers and continue to cook until all are softened. Add the Worcestershire sauce.
  2. Place the chopped root vegetables in a 2 quart saucepan, and cover with broth, probably 2 cups. Bring to a boil, and simmer, uncovered, until the veggies are fork tender, about 10-15 minutes. Dip the veggies out of the saucepan with a slotted spoon or skimmer, and add them to the large pot with the meat and sauteed vegetables. Keep the remaining broth at a low boil.
  3. Make a slurry with the flour and about 1/3 cup broth and pour it into the saucepan, whisking until thickened. Add the milk or half & half, and continue to whisk.
  4. When the sauce is thick, add it to the large pot and add the peas. Taste for seasoning and add the bouillon cube if it seems bland. Add more broth or half & half if it’s too thick. Turn down the heat and keep the filling warm while you prepare the biscuits.
  5. Heat the oven to 375°. Measure the flour, sugar, baking powder, baking soda, and salt into a mixing bowl. Add the butter bits, and cut into the flour until there are no piece larger than a pea left. Dump in the yogurt and mix with a spatula until there isn’t any dry flour remaining.
  6. Turn the dough out onto a floured surface and knead it briefly until it come together. Pat the dough out into a rough square that’s about 1 inch thick. Fold it into thirds like a letter, and the pat or roll out into a square again. Repeat the folding and rolling 2 more times, finally rolling the dough out to be about 1 inch thick. Transfer the filling into a 2 quart baking dish or really large pie plate. Cut as many 3 inch biscuits as you can – I got 10 – and arrange them on top of the filling. Place the pot pie n the oven and bake for about 30 minutes until the biscuits are brown and the filling is bubbly. Let rest for 10 minutes – or until it stops bubbling furiously – before serving.

Butternut squash, sausage, and pasta bake

This pasta bake is like many others: homey and cheesy and comforting. What sets it apart is the butternut squash in the sauce, that makes the dish taste as rich as similar bakes with a lot more cheese. I’ve used ground or link pork sausage here, but try chicken or turkey sausage if you prefer, and you can make this vegetarian by subbing in some greens instead of the sausage.

Prep time: 30 mins.
Baking time: 30 mins.
Serves: 8

12 ounces pasta of your choice, I used penne
1 tablespoon olive oil
8 ounces ground Italian sausage or 3-4 links with casings removed or sliced, if it’s the type of sausage where you can’t remove the casing
1 large bell pepper, seeded and chopped

Sauce:
2 tablespoons butter
2-3 leeks, white and light green parts only, split longways and thinly sliced
2 pounds butternut squash, peeled and cut into cubes
2 to 2 1/2 cups chicken or vegetable broth, OR 2 cups reserved pasta cooking water and 1 bouillon cube
1/2 teaspoon ground or freshly grated nutmeg
1/2 cup grated Parmesan
1 1/2 cups grated cheese – sharp cheddar or a combination of cheddar and Swiss is good
kosher salt and freshly ground black pepper

Topping:
1 cup breadcrumbs (can be fresh or dried)
2 tablespoons olive oil
1 small garlic clove, minced or put through a press
1/4 cup grated Parmesan

  1. Cook the pasta in a large pot of well-salted boiling water until it’s a bit underdone, since it will be baked. Drain, reserving 2 cups of the cooking water if you are not using broth. Drop the bouillon cube into the reserved pasta water to melt while you prepare the other parts of the dish.
  2. Heat the olive oil in a large skillet, and brown the sausage. If using ground sausage, break it into smaller clumps with a wooden spoon as it browns. If you have any other type of link sausage, slice it and brown in the oil. Add the chopped bell pepper and continue to cook until the pepper is soft. Remove from the heat and set aside.
  3. Melt the butter in a large pot or Dutch oven with a lid. Add the leeks and a generous pinch of kosher salt, stir, and cover. Reduce the heat to low, and cook until the leeks are soft but not brown, about 10 minutes. Add the squash cubes and the broth (or pasta water/bouillon mixture), cover, and simmer until the squash is tender, about 10 minutes. The squash cubes should be submerged; add a little more water if necessary. Remove from the heat and puree until smooth using an immersion blender. You can also use a food processor or blender but cool the mixture for about 10 minutes before proceeding. Add the nutmeg and the Parmesan and grated cheese(s) and stir until the cheese melts. Taste and season with salt if needed and freshly ground pepper.
  4. Heat the oven to 400°. Stir the sausage mixture and the pasta into the sauce and spread into a 9 x 13 x 2 baking dish. Bake for 20 minutes until bubbly.
  5. For the topping, heat the olive oil in a pan and add the minced garlic. Add the bread crumbs, stir to coat with oil, and cook a few minutes until the crumbs are slightly toasted and the garlic is fragrant. Set aside to cool. After the pasta has baked for 20 minutes combine the 1/4 cup Parmesan and the crumbs, which should be cool by now, and top the pasta with this mixture. Bake for 10 more minutes and serve.

Braised red cabbage with apple and bacon

4 ounces of bacon, 5-6 slices, cut crosswise into 1-inch pieces
olive or vegetable oil, if needed
1 cup of chopped onion
2 pounds of red cabbage, shredded or thinly sliced
1 medium apple, cored, quartered, and sliced (about 1 cup of slices)
2 tablespoons brown sugar
1/4 cup water
1/4 cup cider vinegar
Salt and freshly ground pepper to taste
Note on shredding cabbage – you can use a box grater or food processor to shred the cabbage, or (my preferred method) cut it into quarters and thinly slice each quarter crosswise with a sharp knife.

  1. Place the bacon bits in a Dutch oven over medium heat and fry until crisp. Remove with a slotted spoon to paper towel to drain.
  2. Pour the bacon fat into a small bowl and wipe out the Dutch oven. Measure two tablespoons of bacon fat and add to the pan, adding olive oil if necessary. Add the chopped onions and cook over medium heat until translucent. Add the cabbage – you may have to do this in batches, covering the pan in between to wilt the cabbage down to make room. Season with salt and pepper, stir well, and cook covered for about 5 minutes.
  3. Add the apple, brown sugar, water, and cider vinegar, and stir to combine. Bring to a boil, then cover and reduce the heat and braise the cabbage for about 20 minutes, until very soft. Check at about 10 minutes to make sure it’s not getting too dry. Add a little water of necessary.
  4. When the cabbage is as tender as you like it, taste and check for salt. Sprinkle the bacon bits over and serve.

Sweet Potatoes Stuffed with Greens & Peanut Sauce


Serves: 4 as a side; 2 as a main course
Takes: 40 minutes to an hour to roast the potatoes; about 20 minutes active time to make the filling & stuff

The basic technique in this recipe can be varied many ways; try black beans with salsa and cheese, or swap tahini or almond butter for the peanut butter. It’s not strictly necessary to scoop out the potato and stuff it back into the shell with the filling ingredients. You can simply pile the filling on top of the potato halves and serve. The stuffed sweet potatoes reheat beautifully in the microwave (or oven) and you can also roast the potatoes and refrigerate for later stuffing and eating. I tested this recipe with Koji greens (minus the stems) because that’s what I had, but just about any green will work, such as kale or collards. If using a softer green like spinach use 1 pound instead of 8 ounces.

Potatoes:
2 large sweet potatoes, about 1 3/4 to 2 pounds
1 tablespoon vegetable oil

Filling:
1/2 pound greens, such as kale or collards, washed, large stems removed, and thinly sliced
2 tablespoons vegetable oil
kosher salt
2 large cloves of garlic, minced or put through a press
2 tablespoons fresh ginger, grated
1-2 tablespoons soy sauce or tamari
1 tablespoon brown sugar or honey or maple syrup
1 tablespoon rice vinegar
1 tablespoon Sriracha or other hot sauce, optional
1/4 – 1/3 cup natural peanut butter, smooth or crunchy (I like crunchy!)
Extra hot sauce and chopped peanuts for serving

  1. Roast the potatoes: heat the oven to 450°. Scrub the potatoes and cut in half lengthwise. Arrange on a parchment lined baking sheet and drizzle with the oil. Turn the potatoes cut sides down and place in the oven and rost for 40 minutes to an hour until soft. Remove form the oven and cool until easy to handle.
  2. Make the filling: Pour 2 tablespoons vegetable oil into a wide deep skillet with a lid. Add the greens and a few pinches of salt, stir to coat with oil, and cover and cook to wilt the greens, 5-10 minutes.
  3. Uncover the skillet and add the garlic, ginger, soy sauce, brown sugar, and rice vinegar. Stir and then add 1/4 cup peanut butter. Cover the pan again and cook for a few minutes to melt the peanut butter. Stir and if it doesn’t seem saucy enough to you, add more peanut butter.
  4. Stuff the potatoes: Scoop out the center of the sweet potatoes and mash into the greens and sauce. Spoon the filling back into the potato shells. Set the potatoes back in the oven for about 15 minutes to reheat and serve with optional hot sauce and peanuts. Alternatively cool the potatoes and reheat in the microwave (or oven) to eat later.

Cauliflower Coronation Salad

This is a vegetarian version of Coronation Salad, a curried chicken salad that was the official dish for Queen Elizabeth II’s coronation in 1954. The chicken version is often served as a tea sandwich filling on buttered white bread; try this vegetarian version in pita or on a bed of greens. I think it would also be good on any type of sandwich roll. You could make this vegan by using egg-free mayo, and non-dairy yogurt in the dressing.

Ingredients:

One large head of cauliflower. about 2 pounds, cut or broken into small flowerets, 8-9 cups of flowerets
3 tablespoons of olive oil, divided
Kosher salt
1/2 cup mayonnaise
1/2 cup plain Greek yogurt or sour cream
1 tablespoon curry powder
1 teaspoon of Garam Masala
1/2 teaspoon celery seeds
1 teaspoon sweet paprika
Zest and juice of one lemon
1-2 tablespoons honey, to taste
1 cup of pecans or walnuts, toasted and coarsely chopped
1 apple cored and diced into small pieces – about 1 heaping cup of apple
1/2 cup raisins
2/3 cup chopped parsley
additional salt and freshly ground pepper

  1. Lightly oil a large baking sheet with one tablespoon of the olive oil and place it in the oven while you heat the oven to 400°.
  2. In a large bowl, toss the cauliflower florets with the remaining two tablespoons of oil and a few good pinches of kosher salt. When the oven is hot, add the cauliflower to the hot sheet pan, and spread it out into a single layer. Roast for about 20 minutes until tender and browned. Remove from the oven and cool.
  3. While the cauliflower roasts, mix the dressing. Combine the mayonnaise, yogurt, curry powder, Garam Masala, celery seeds, paprika, lemon zest and juice, and honey in a small bowl or spouted glass measuring pitcher that’s at least 2 cups. Whisk until smooth.
  4. When the caulifower is cool, transfer it from the baking sheet to a large mixing bowl, and add the apple, raisins, and parsley. Pour about 2/3 of the dressing over and mix well. Taste and adjust seasoning, and add more dressing to taste. It will probably need more salt and grin in some pepper. Chill for about 30 minutes, or up to overnight, before serving. the extra dressing is good on any lettuce salads.

Roasted Tomato and Squash Quiche

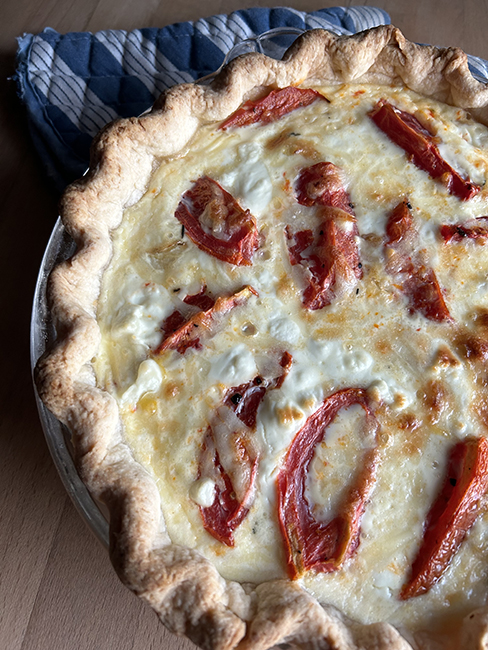
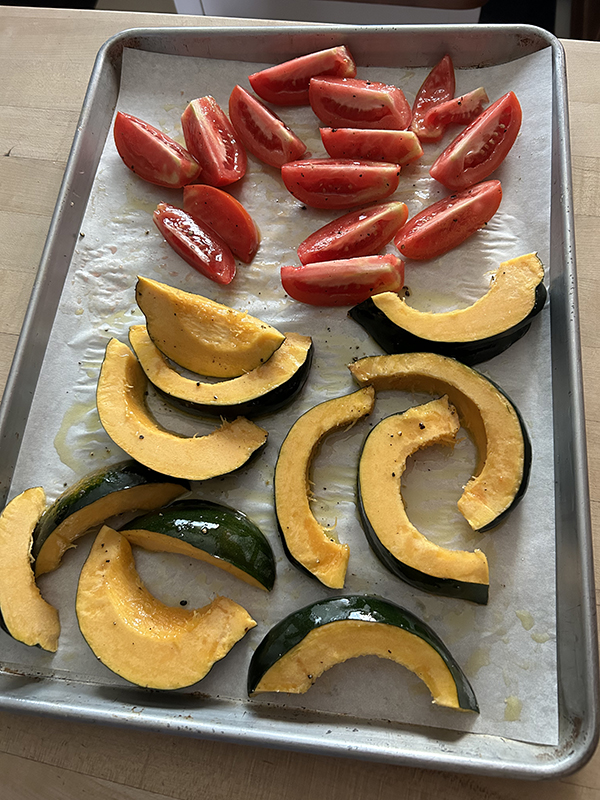
This quiche is made with peeled squash but the varieties of winter squash, like acorn and jester, that have ridged shells can be hard to peel when raw. It’s a lot easier to remove the skin after the squash is cooked, so that’s what I’ve done here. And roasting the tomatoes concentrates the juices and makes then even sweeter. I’ve used Provolone cheese and a bit of goat cheese, but feel free to sub in other cheeses to your taste.

Takes: about an hour, but can be done in stages
Serves: 6-8

Ingredients:
Crust for a single crust, 9-inch pie, store bought or here’s a recipe
One medium size acorn-type squash
2 slicing tomatoes, cut into wedges, then chunks OR 2-3 plum tomatoes cut into wedges
salt and freshly ground pepper
Approximately 2 tablespoons olive oil
1 cup thinly sliced onion
1 tablespoon butter
1/2 teaspoon dried thyme, or 1-2 tablespoons fresh herbs, basil or parsley suggested
1 cup provolone or other good melting cheese, grated
about an ounce of soft goat cheese, optional
3 eggs
about 1 1/4 cups half and half
extra fresh herbs for garnish, optional

  1. Make your crust and chill – this can be done the day before – or even several days before. Roll out the crust – or unfold purchased crust – and fit it into a deep 9-inch pie dish. Set the crust in the fridge while you make the filing.
  2. Line one large baking sheet, such as a half sheet pan that’s 18 x13, or two smaller ones, with parchment. Heat the oven to 400°. Arrange the tomatoes on one end of the baking sheet, or on one of your smaller baking sheets. Cut the squash in half and scoop out the seeds. Cut each half of the squash into wedges, and arrange on the other end of a large baking sheet, or separately on a smaller baking sheet. Salt the vegetables, and grind black pepper over. Drizzle with the olive oil and toss – you might not use the full 2 tablespoons. Flip the tomatoes so the cut sides are up. Place in the oven and roast for 20-30 minutes until the squash is soft and the tomatoes have released their juices. Remove from the oven and cool. This can be done several hours ahead.
  3. Melt the butter in a skillet and add the onions. Cook over medium high heat, stirring occasionally, until the onions are slightly caramelized, about 10 minutes. At the end of the cooking time, stir in the thyme or fresh herbs, and remove from the heat. While the onions cook, peel the cooked squash – I find this easiest to do with a spoon, creating rough wedges of cooked squash.
  4. Assemble the quiche: Heat the oven to 425°, and put one rack near the bottom and the other about in the middle. Spread 3/4 of the grated cheese on the bottom of the crust, then lay the squash over the cheese, breaking it into chunks with your fingers. Add the onions on top of the squash, then the tomatoes, and finish with the last 1/4 of the grated cheese.
  5. Beat the eggs in a 2-cup glass measuring pitcher until they’re well-blended, then add enough half and half to get to the 2 cup mark. Crumble in the goat cheese if using, mix well, and pour the egg mixture over the veggies in the quiche shell.
  6. Place the quiche on the bottom rack and bake for 15 minutes. After 15 minutes, move the quiche up to the upper rack, and reduce the heat to 375°. Bake until slightly puffed and golden, about 25 minutes. Cool for 10-15 minutes for easiest slicing. Garnish with the optional fresh herbs and serve.

Roast Tomatoes over Spicy Beans with More Tomatoes

Takes: 45 mins. to one hour
Serves: 4-6

This recipe includes tomatoes two ways – roasted and in a sauce with a bit of Korean gochujang. It’s based on a recipe by the British food writer and cookbook author Nigel Slater, who uses butter beans, which is what the Brits and some US Southerners call lima beans. I used giant white Corona beans from Rancho Gordo (sometimes available at Willy Street Co-op). You can use any meaty white beans in this recipe, such as great northern beans or cannellini beans; I think even garbanzo beans would work, either canned or cooked from dried. You can also use any type of tomatoes – I roasted slicers and used Romas in the sauce – but again use what you got. Be sure to drizzle a few spoonfuls of the roasted tomato juices over each serving, and serve with crusty bread for mopping up the sauce, possibly yeasted corn bread.

More about the bread: Cookbook author and photographer Heidi Swanson has been posting recipes to her 101 Cookbooks blog for close to 20 years, and this cornbread is an early one, from 2007, and works beautifully as written. I tweaked Heidi’s method just slightly: I made a sponge with all of the water and yeast, and let that rise for about an hour until nice and bubbly. Then I added the remaining flour, and cornmeal, oil, honey, and corn. I omitted the chives, and also used a combination of white and whole wheat flour, instead of the white whole wheat suggested. Finally, instead of doing a rise at the ball of dough phase I shaped my rolls and let those rise for about another hour, and baked them. Heidi suggests baking the rolls in muffin tins which would be pretty if you have fluted ones, as shown in the top picture – I baked my rolls in 2 cake pans, and got 16 as promised in the recipe. Scroll aaallll the way down for a pic!

For the roasted tomatoes:
5-8 tomatoes, depending on size and how many people you’re serving
3-4 tablespoons of olive oil

For the beans and sauce:
1 1/2 to 2 cups chopped onions
salt and fresh ground pepper to taste
3 tablespoons olive oil
3 cloves of garlic, peeled and shopped or put through a press
3/4 pound tomatoes, slicers or Romas, chopped – peeling optional
2 teaspoons yellow mustard seeds
1 teaspoon ground cumin
1-2 tablespoons gochujang, depending on your taste for heat
2 14-ounce cans white beans, drained, saving about 1/2 cup of the liquid, OR 2 1/2 to 3 cups white beans cooked from dried, with about 1/2 cup of the cooking liquid
Chopped fresh herbs, such as basil or parsley, optional

  1. Roast the tomatoes: Heat the oven to 425°. Rinse the tomatoes you’re going to roast, and remove the stems, but otherwise leave whole. Nestle the tomatoes in a glass baking dish that holds them pretty snugly, and drizzle the 3-4 tablespoons olive oil over. Try to use a baking dish that just holds the tomatoes – I used a slightly-too-large dish and my kitchen got a little smoky until the tomato juices ran and covered the exposed olive oil in the bottom of the pan! Roast for about 40 minutes, until the tomatoes are brown on top – the original Nigel Slater recipe says until they have “tan on their shoulders” – and they’re just starting to split and collapse.
  2. While the tomatoes roast, make the beans and sauce: pour the 3 tablespoons olive oil into a 10-12 inch deep skillet with a lid, and heat to medium high. Add the onions and salt and pepper, stir, and reduce the heat to so it’s at a gentle simmer. Add the garlic. Cook gently until the onions are tender, about 10 minutes. Add the chopped tomatoes, mustard seeds, cumin, and gochujang, and continue to cook until the tomatoes are starting to break down, about another 10 minutes. Add the beans and their liquid, stir, and taste for seasoning. Cook for about 10 more minutes until the beans are heated through. If the roasting tomatoes aren’t done at this point, cover the pan, reduce the heat to low, and simmer until the roasters are ready.
  3. Stir the optional chopped herbs into the sauce, and serve in wide shallow bowls. Give each person a whole tomato with some of the tomato juices.

Quick Crust Deep Dish Pizza

Cheat's Deep Dish
photo by debslunch

Serves: 3-4
Takes: ~45 minutes, depending on what toppings you use!

This pizza is based on Jamie Oliver’s Cheat’s Deep-Pan Pizza. Jamie’s is filled with sausage, onion, and pickled jalapeños and topped with cheddar, but you can use any type of summer vegetables, and add tomato sauce if you like (and have some around!). My version’s filling is bulk Italian sausage, onions, garlic, corn, and red bell pepper topped with a combination of provolone and pepper jack and sliced tomatoes. The trick to this pizza is preparing the filling in a cast iron pan. That gets the pan hot and well greased, then you remove the filling and stretch the dough in the same pan, top, and bake in a hot oven. It’s perfectly OK to omit meat and make your pizza vegetarian, just use the larger amount of olive oil when preparing the filling. The pizza needs to bake in a hot oven but only for a short time, so perfect for hot summer days!

Crust:
2 cups flour – I have only tested unbleached, but I’m sure adding part whole wheat would work just fine
3 teaspoons baking powder
1 teaspoon kosher salt
1 teaspoon sugar, optional
1/2 to 2/3 cup lukewarm water
1 tablespoon olive oil

Pizza:
1-3 tablespoons olive oil (the larger amount is recommended for a vegetarian pie)
8 oz. Italian sausage
3/4 cup sliced onion
2 cloves garlic
small amounts of dried oregano, fennel seed, red pepper flakes, optional
kernels cut from 1 ear of corn
half a bell pepper, sliced
OR about two cups assorted vegetables, OR less veggies and 1/3 cup prepared tomato sauce
1 generous cup grated cheese, your choice
sliced tomatoes for topping
julienned fresh basil leaves, optional

  1. Make the crust: combine the flour, baking powder, salt, and sugar if using in a medium bowl. Add 1/2 cup water and the olive oil, and mix adding more water as needed to get a pliable dough, with no spots of dry flour. Turn the dough out onto a lightly floured surface and knead until smooth. Invert your scraped out mixing bowl over the dough and let it rest while you make the filling.
  2. Make the filling: Heat the oven to 475°. Add 1 tablespoon olive oil to a 10-inch cast iron skillet over medium high heat. Add your sausage if using, and brown while breaking the meat into small chunks with a wooden spoon. Add onions, garlic, and optional herbs & spices, and continue to cook until onions are starting to caramelize, about 10 minutes. Add the corn and bell pepper, stir, and continue cooking until peppers are soft, another 5 minutes or so. For vegetarian pizza, start with 2 tablespoons of oil, add the onions and garlic, then any additional vegetables and spices you like. (Cubed zucchini from this week’s box would be nice with corn!)
  3. Assemble and bake the pizza: Turn the heat under the pan to low. Uncover your dough and roll out to a 9- to 10-inch circle. Scrape your filling into the mixing bowl that was covering the dough. If using meat, add more olive oil if the pan seems dry; if using vegetables only, add the 3rd tablespoon of olive oil. Fold your dough in half, gently – some people like to roll it around the rolling pin – and lay it in the pan. With your finger tips, carefully stretch the dough in the hot pan covering the bottom and going up the sides. If using sauce add it now, spread the filling over the crust, then rest of your toppings. Sprinkle the grated cheese over. If using fresh sliced tomatoes, make a layer of most of the cheese, arrange the tomatoes over the cheese, then top with the last of the cheese. Place in the oven and bake for 15-20 minutes until golden brown. Let rest 5-10 minutes before slicing. Top with fresh basil if desired. I like to remove the pizza from the pan to a cutting board to make it easier to slice.